
40 acres with no power, no water, and no sewer.
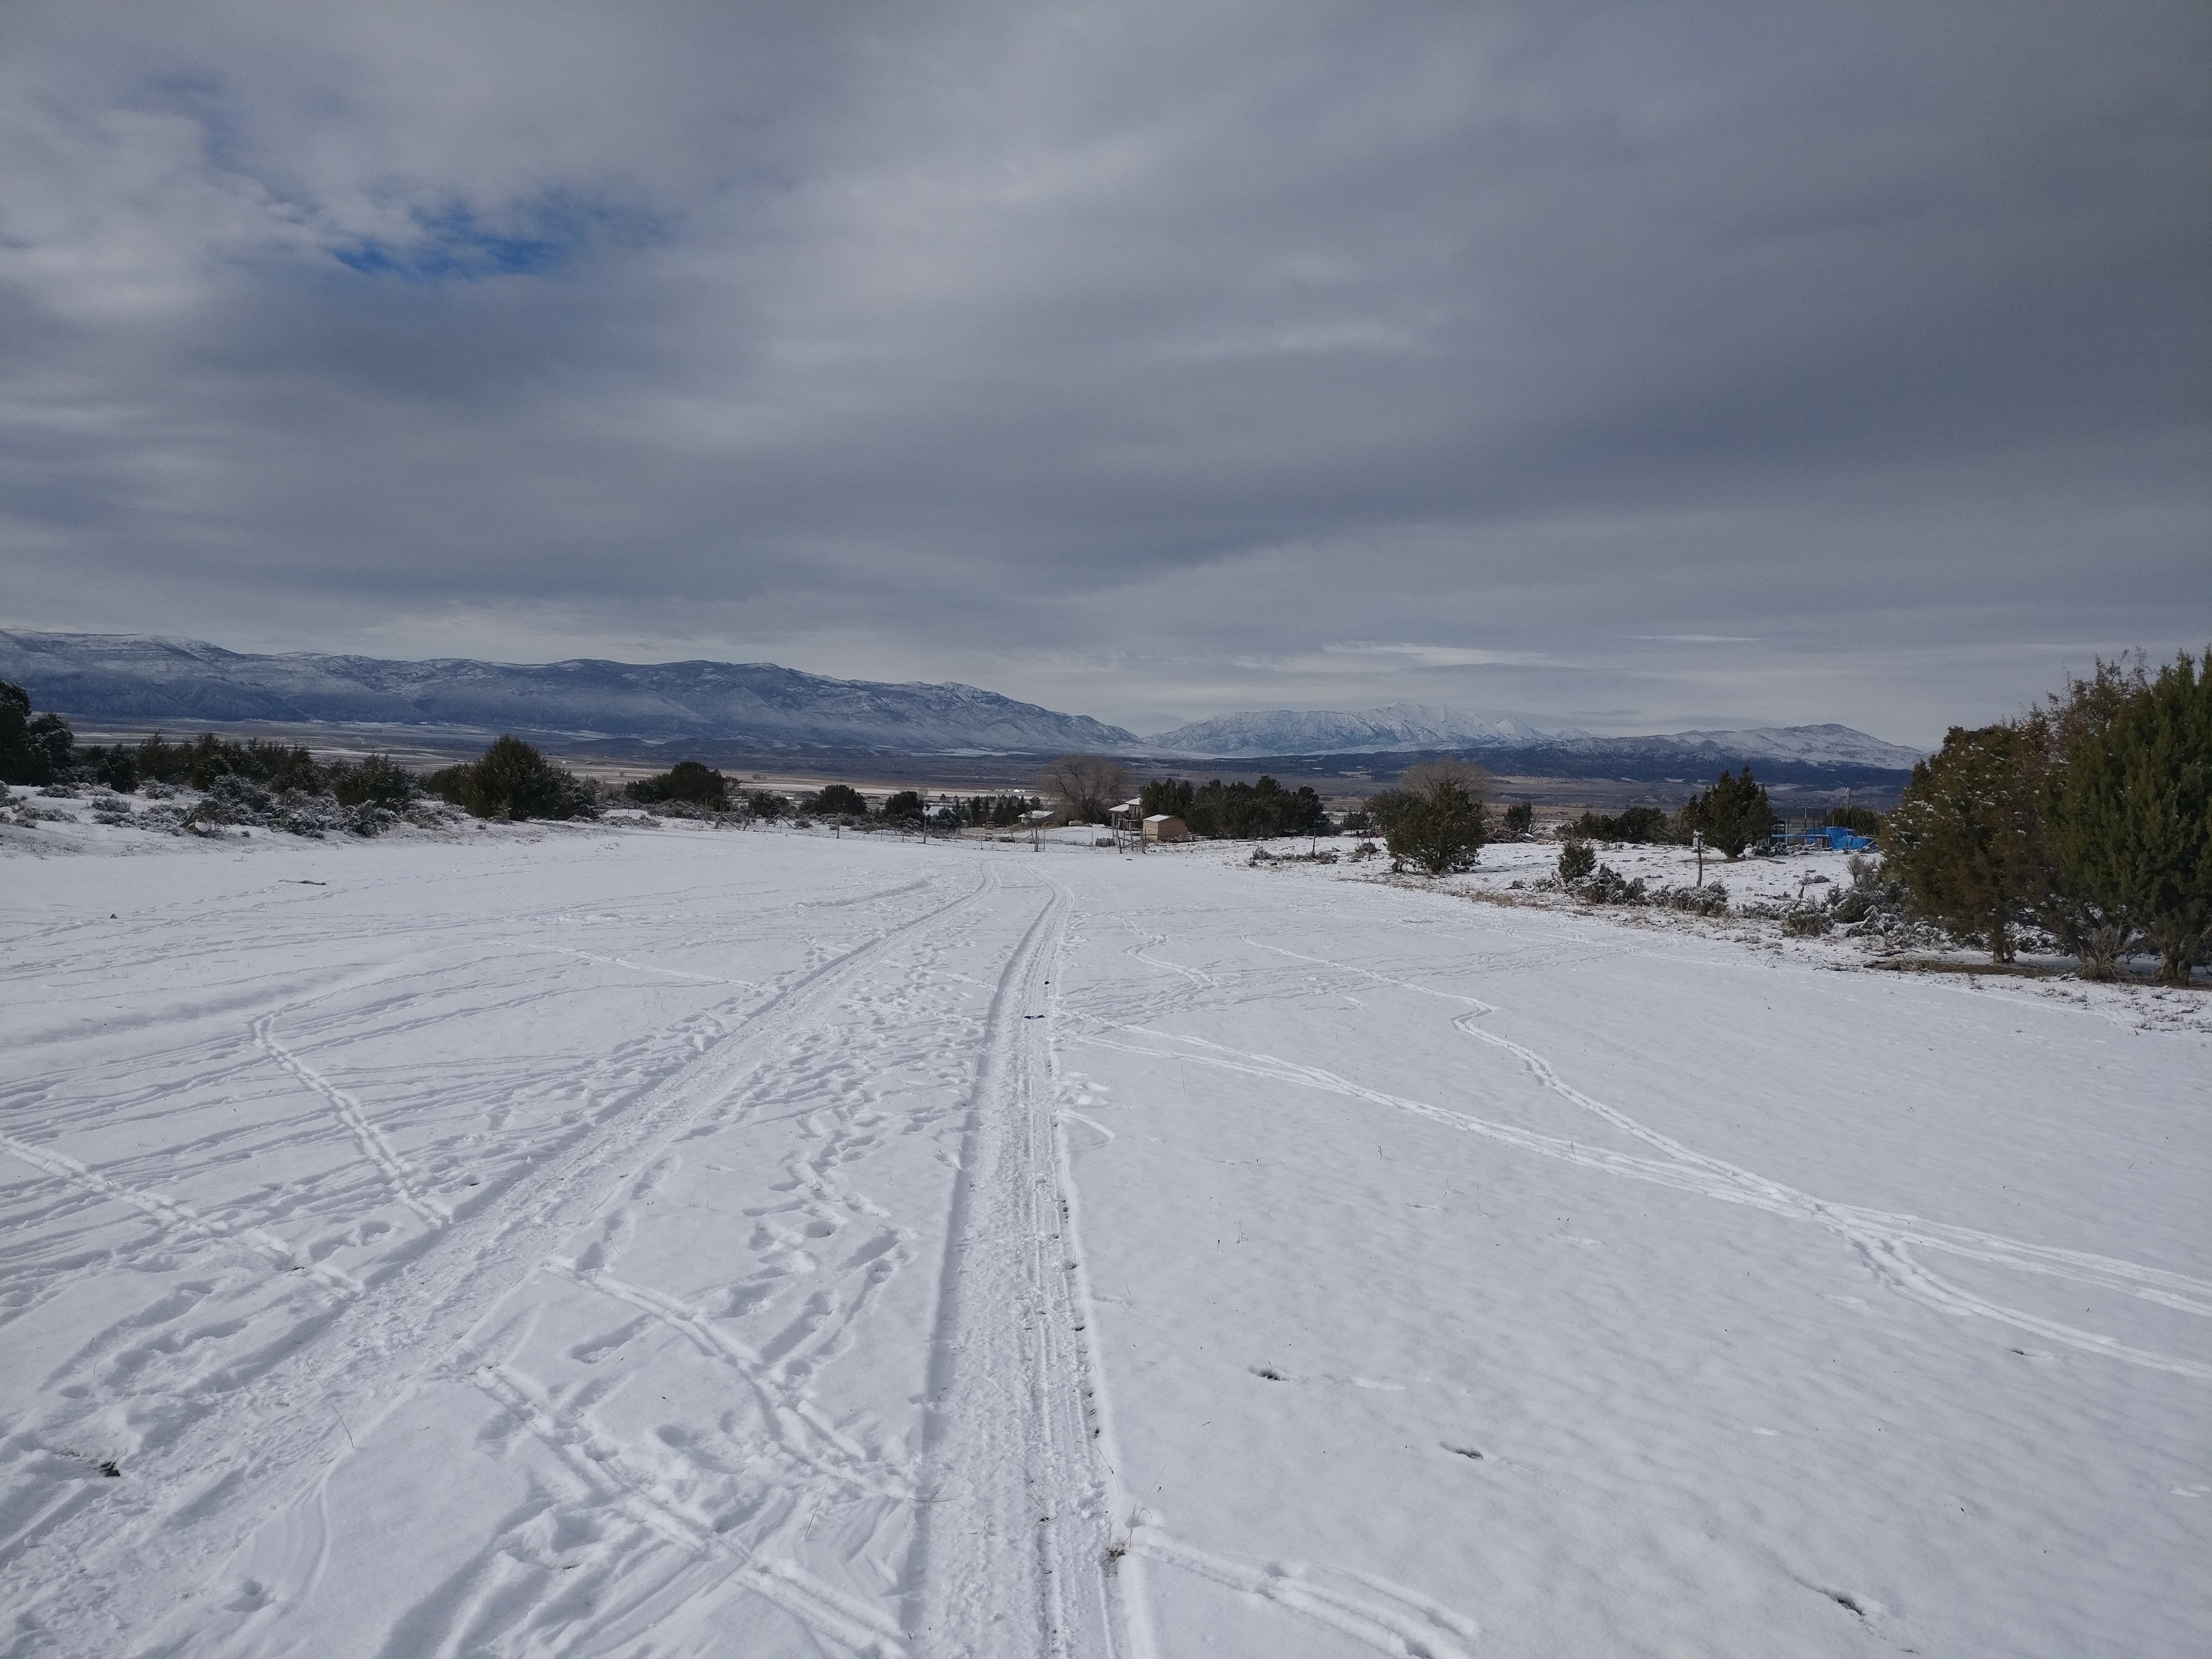
We found a large property a couple of miles outside of Spring City that worked with our budget and had great potential for off-grid living, enough water for small-scale agriculture, privacy, and room to raise our growing family. The views are incredible, but I don't have the skill to capture them with a camera. We loved the juniper trees, the smell of the sage brush, and the open fields. The only reason we could afford it was the fact that it was so far from utilities — most people wouldn't want to pay to run power about a mile and then deal with their own water, septic, and gas. That distance was exactly what we were looking for.
Everything was going smoothly with the design phase and with starting to put infrastructure into the property. No issues were identified by the zoning department, the plans were ready to submit to the building department — but at our meeting with the county commissioners to create the actual buildable lot, they found that we did not have legal access to our land. The county maps showed that the county had an proper easement for the road running along the property, but it turned out to only be a prescriptive easement due to them having maintained that roadway for years. It applied only to the road surface itself, not to any land on the sides. Our land came up a couple of feet short of the road surface, so we had to acquire half of the road surface from our neighbor.
If I had known about that problem in advance I probably would have passed on the land or lowered our offer considerably — it was no small problem. I was fortunate that my neighbor was a reasonable person and didn't take advantage of my situation, but that doesn't always happen. Buyers of rural land should verify legal access explicitly and independently before making an offer. Not even county maps are completely trustworthy.

Acreage
40
Outside Spring City
At purchase
No utilities
Power, water, sewer — none
Occupants
9
Full-time, 2 born here
Completed
2023
Full county permit
Energy independence without asking the family to give anything up.
My wife and I toured a number of off-grid homes when we were deciding whether to build one. Every single home was making serious compromises to quality of life or was heavily reliant on propane. That wasn't what I wanted. I didn't want to tend a fire and generator all winter long. I wanted great lighting and a modern lifestyle in a large, comfortable house. I don't want "Little House on the Prairie" as my main residence. I want two dishwashers, three ovens, two refrigerators, three freezers, a washer and dryer, my air compressors, and all the hot water I can possibly enjoy.
That was the design challenge: how do you build a large modern home off-grid and control the costs? There were plenty of examples of modern net-zero homes and small off-grid homes at that time, but nothing like what I wanted. I had one shot to do it and it had to be right the first time.
Every site has a best answer. Finding it is the first design decision.
We walked the property every day for about six months, experiencing it through summer, fall, winter, day, and night. After a while I noticed the property had a microclimate and it was more likely to be cloudy in the morning than the afternoon and evening. There was one spot that was consistently warmer and less windy than anywhere else. Every night there was a cool breeze from the East and the South wind was milder. That same spot was adjacent to the most fertile soil for a garden, had unobstructed views of the two most prominent mountain peaks, no shading problems for solar, and allowed the house to be oriented 15 degrees West of South to work with the land while maintaining high solar collection.
There were problems. The land was sloped, it was in the center of the property which meant a long driveway, and there was no view of the valley floor. I found that I could take advantage of the slope for a gravity-fed septic system and excellent drainage. If I designed a longer home anchored to the elevation on the East, and had the excavator move the basement spoil to the West, it would build a berm large enough to create a future lawn, a gradual slope to the rest of the land, and would raise the house just enough to get the valley view — while also providing more uninterrupted roof area for solar. The long driveway became an asset: you can see the house from the road from only one spot.
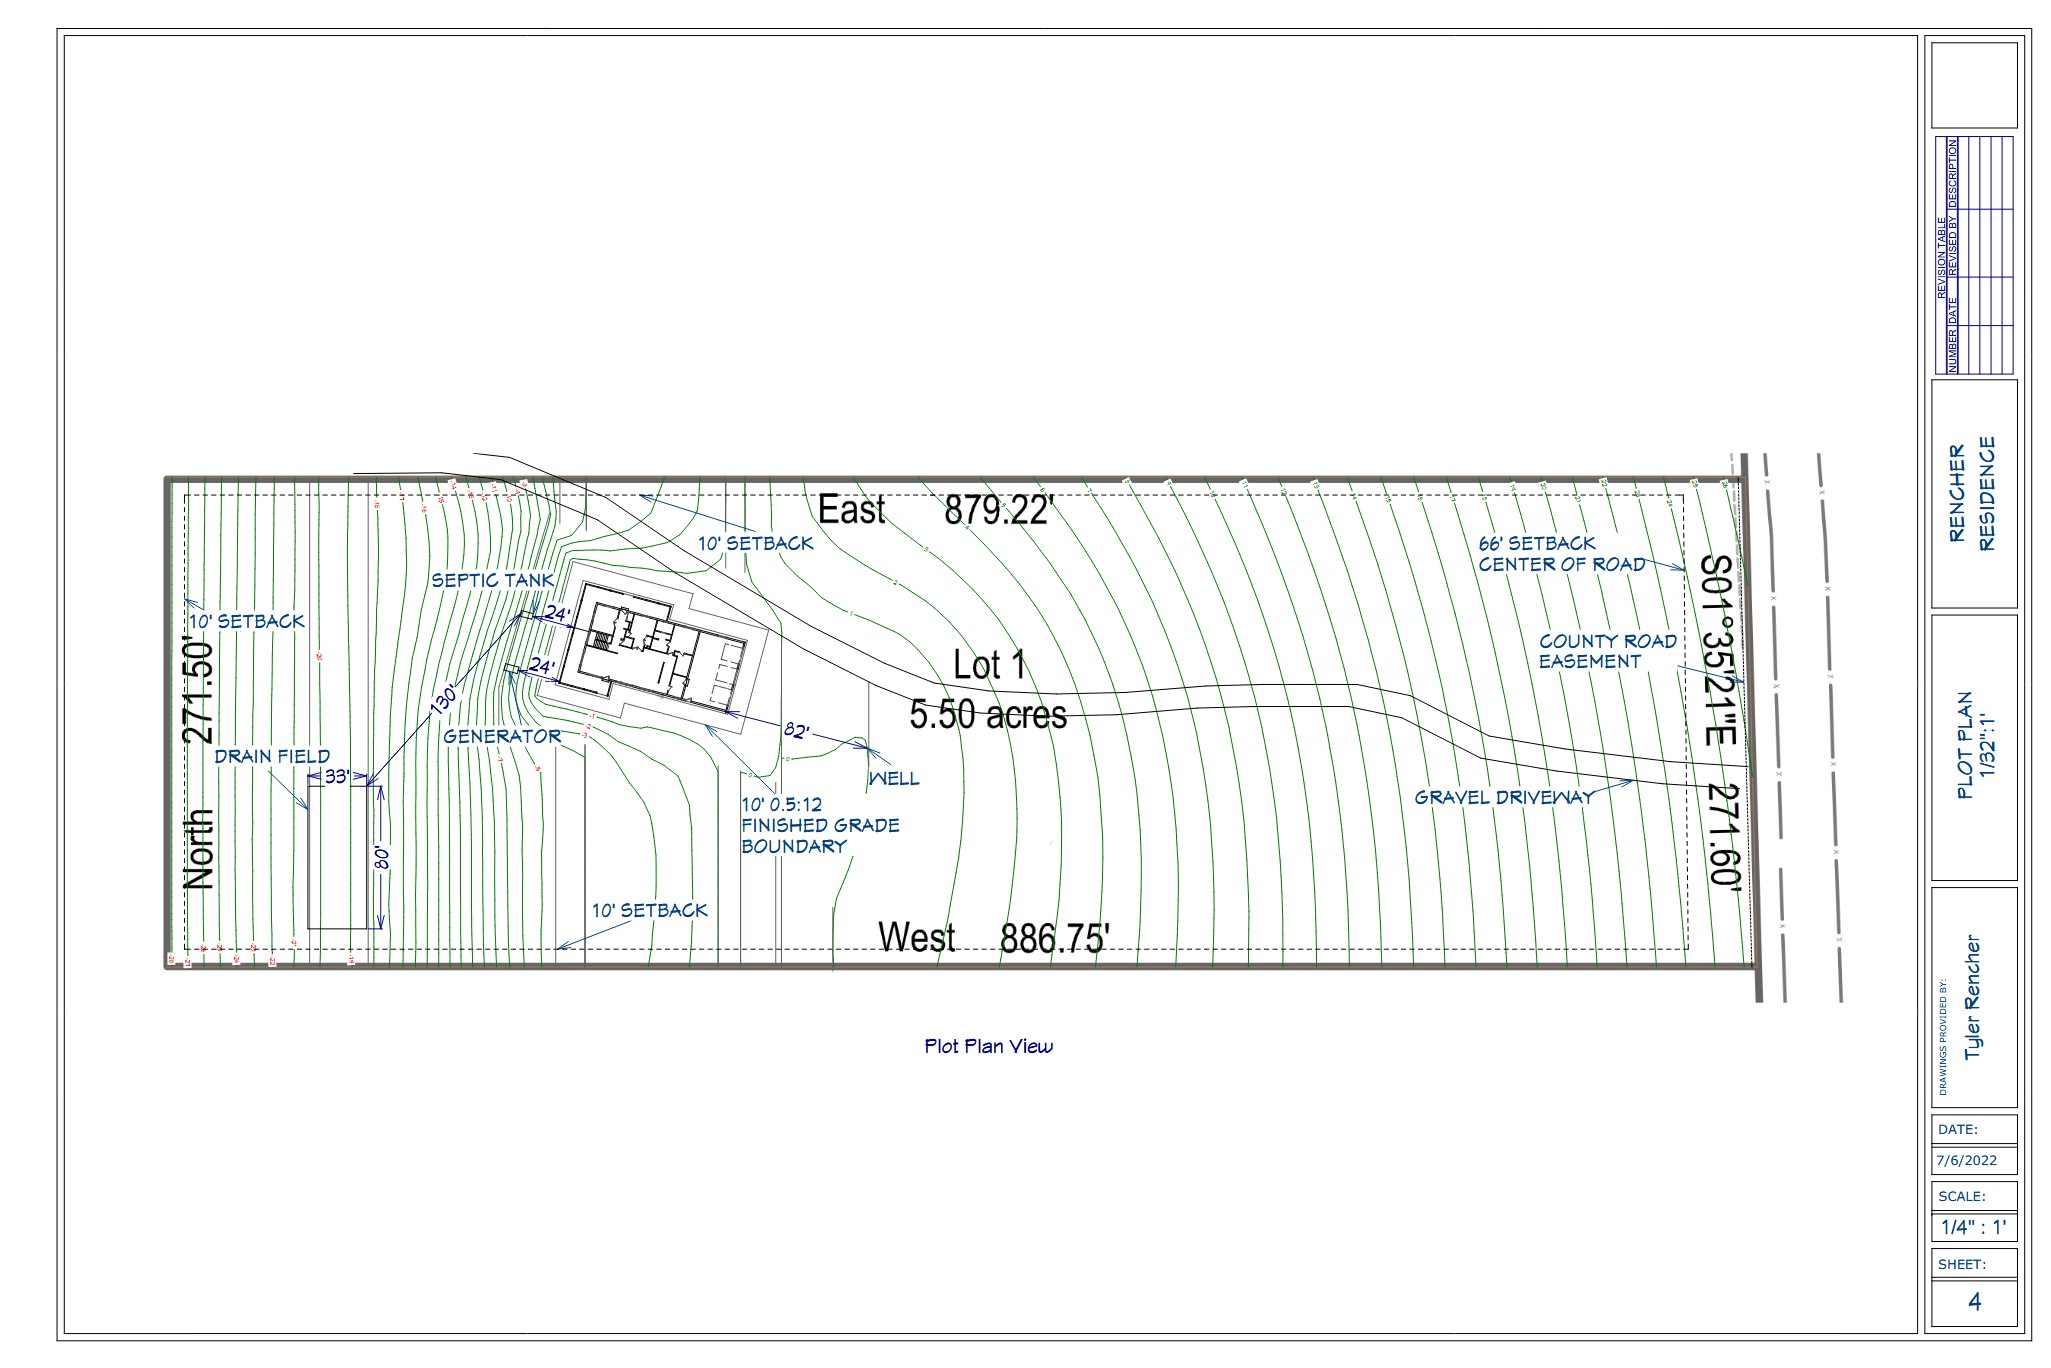
Plot plan from the permit set. The contour lines show the rapid change in land elevation — the excavated basement spoil was moved West to build the berm and capture the valley view.
Designing for how we actually live — not how another family does.
My family is always home. I work from home, my wife homeschools all of our children, and we run a small farm here. Some weeks the only time we leave the property is for church on Sunday. We like to be together, but we also need room to be separate. We have books, stored curriculum, bedding, food, clothes in all sizes, and equipment — all needing a home. Chores twice a day with the animals means lots of coats and muddy boots that I don't want inside. My wife cooks almost all our food and teaches cooking, so she needs a large open kitchen with a big pantry. We decided early that the children would share bedrooms — when they leave home they'll have roommates or a spouse, so learning to share is useful. That meant five bedrooms. A guest room would be nice but people rarely visit overnight, so a children's bedroom would flex for that. My wife needed space for sewing, school preparation, and crafts.
The most important requirement was my wife's ability to watch the youngest children while going about her work. She spends most of her time in the kitchen, at the main table, in the master bedroom, and in her office. The youngest children play in the family room. She parents with her ears, so those spaces have to be close together and fairly open. Regular chores meant the mudroom and garage should connect — the mud boot count is too high and they are too messy to store them anywhere but the garage. House access only from the first floor meant the mudroom goes on the main level. Those decisions defined the entire first floor.
The house needed extensive mechanical spaces — water treatment, HVAC, water heating, air circulation, central vac, and power storage. Power storage was a genuine safety concern: that much energy in a small space is concerning regardless of battery chemistry, and I didn't want children near it. That space needed a locked door on a fire-resistant room. The space under the porch was perfect for bulk storage — cool year-round, unappealing to children, and could include a section lockable for power equipment.
I didn't want a second story visible above the trees to preserve the view from neighboring properties. The large playroom, children's bedrooms, laundry, my office, and secondary bathrooms all went downstairs. The master bedroom was then the only bedroom on the main level. With young children and babies, we don't want to be up and down the stairs all night. The solution was a nursery inside the master suite — it can become a closet in the future, or convert to laundry for single-floor living when that season comes.
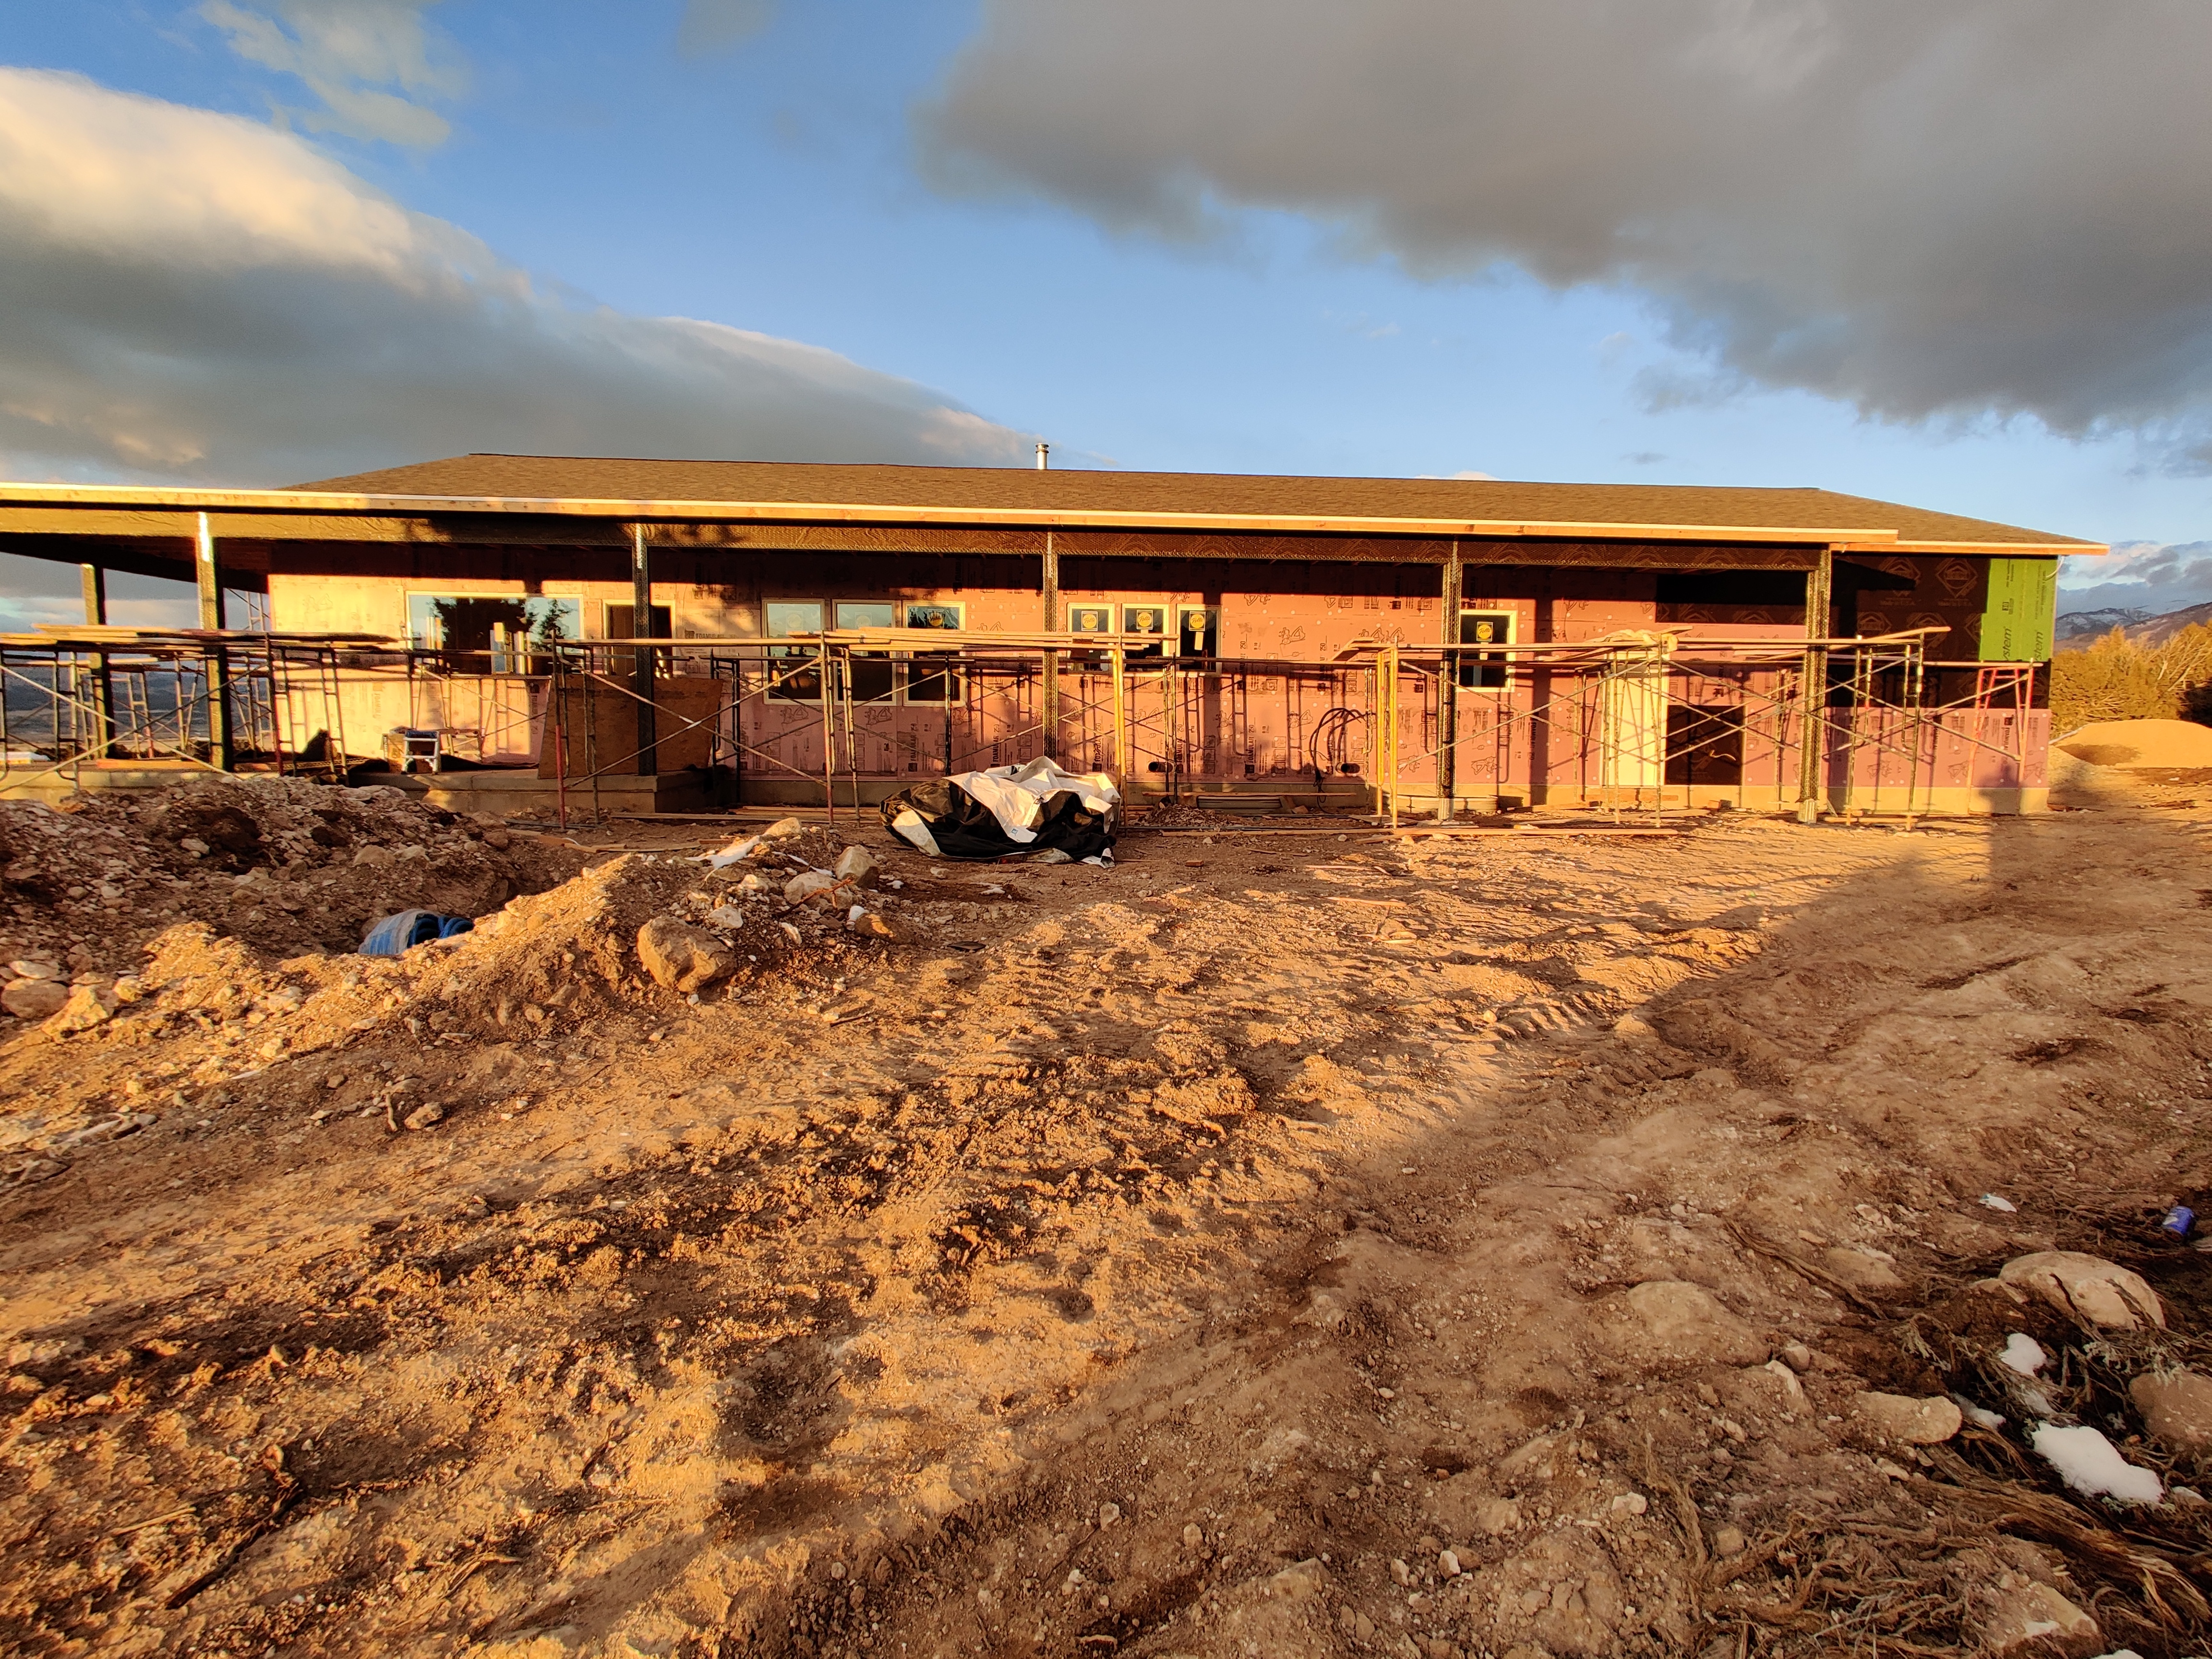
Architecturally the house is very plain, for four reasons: we live in the woods; I needed the south-facing roof long and flat with zero obstructions for solar; we wanted a big wrap-around porch with storage below; and simple houses are cheaper to build. A simple gable on the front breaks up the roof, a bright color makes the porch pillars pop, and a rock facade dresses up the path to the front door. The rectangle simplifies some things by constraining choice, but makes others harder — like getting natural light into parts of the house that a more complex footprint could reach easily.
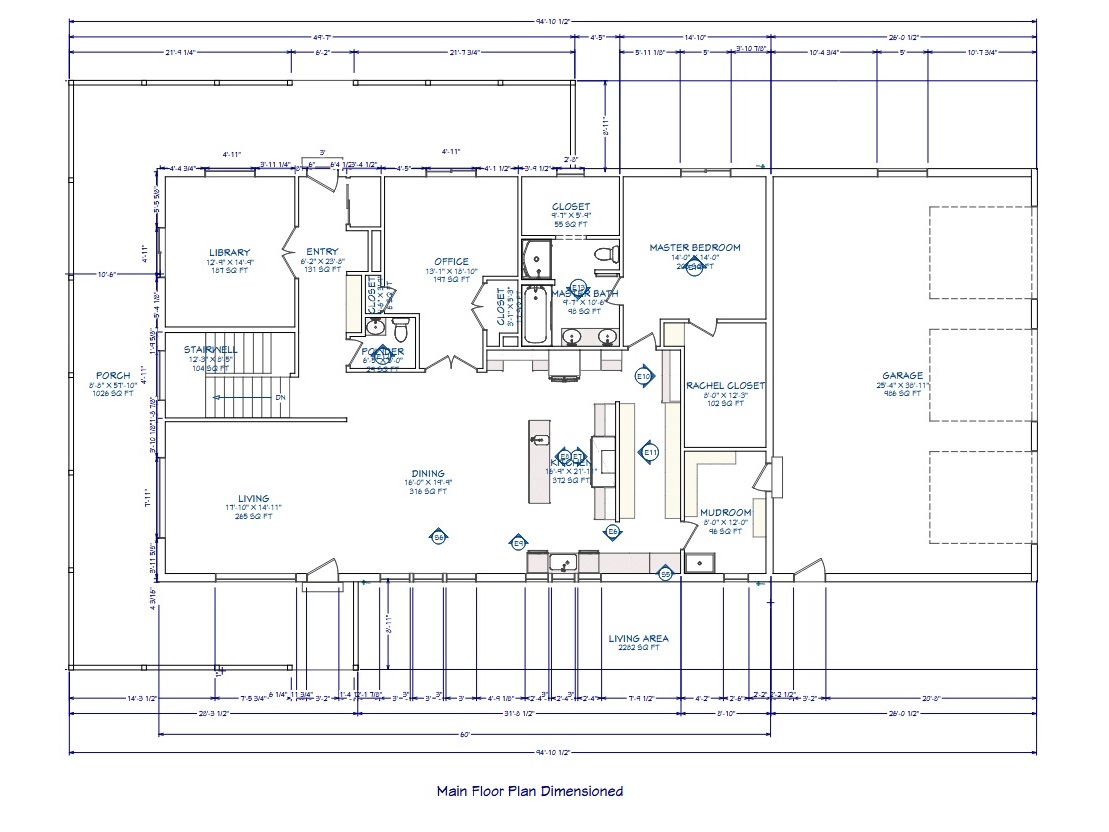
Main level plan from the permit set. Click to enlarge.
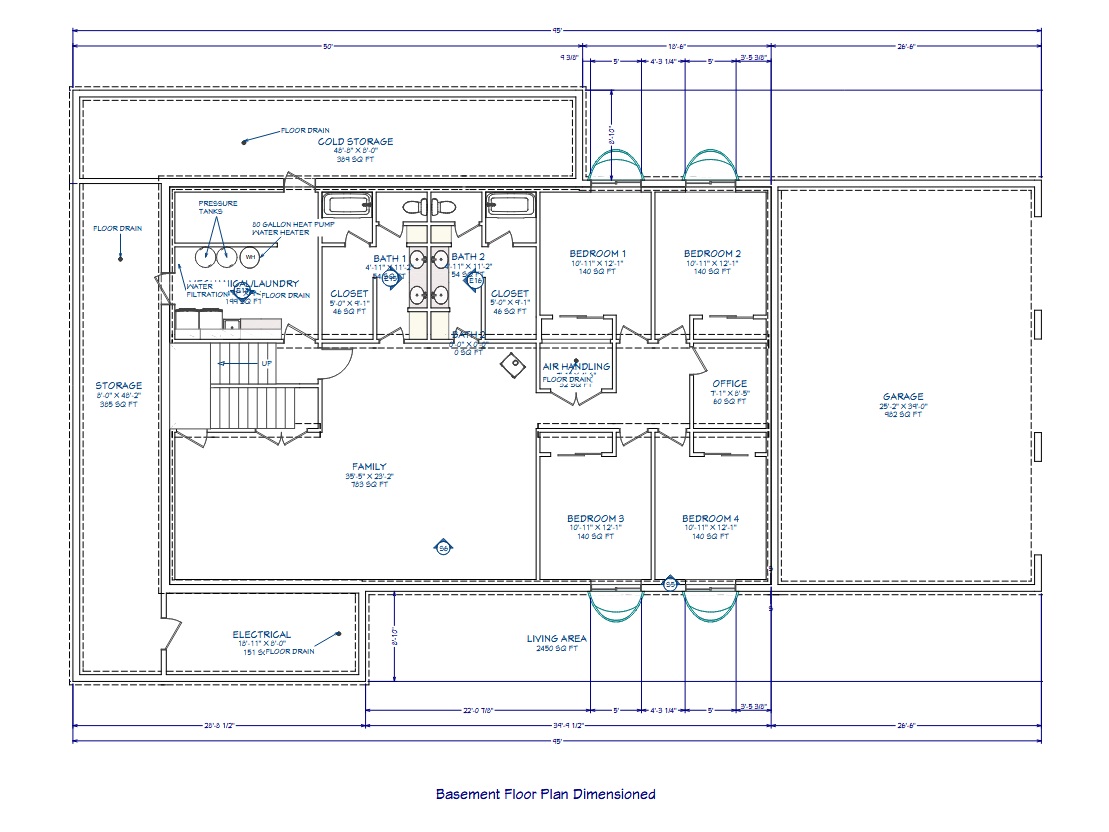
Basement level plan from the permit set. Click to enlarge.
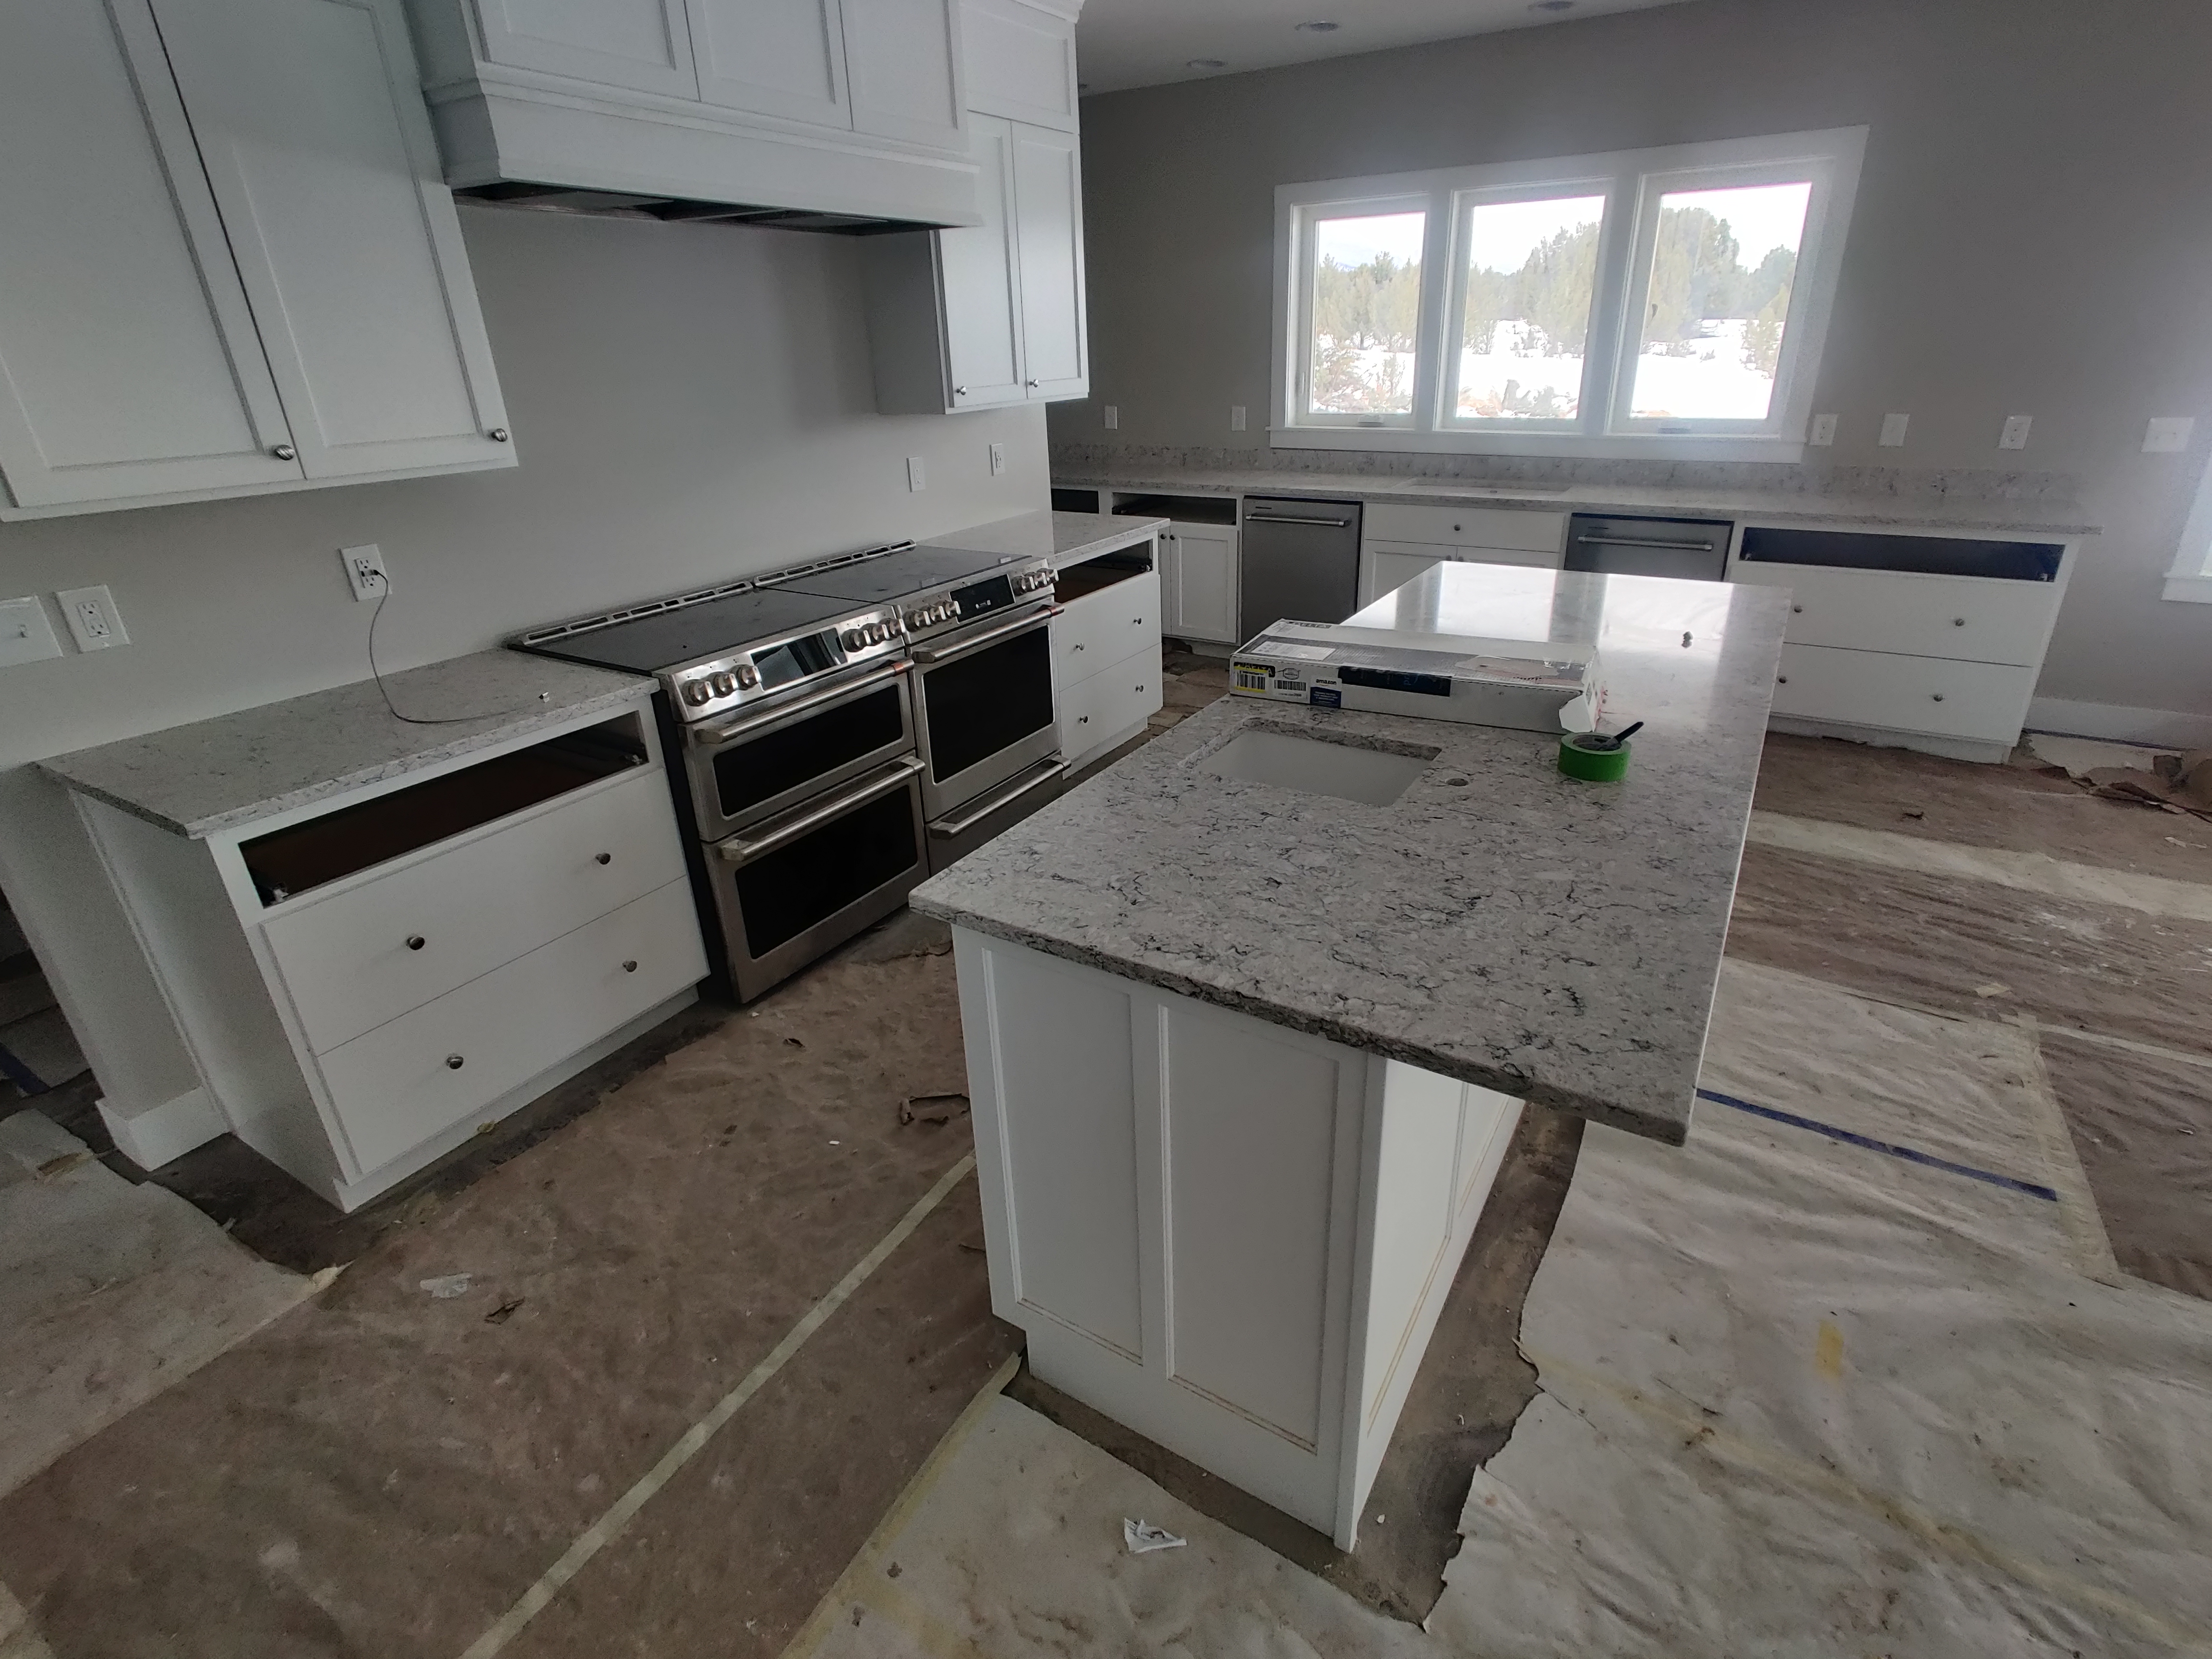
Kitchen looking South — dual ranges nearing end of construction.
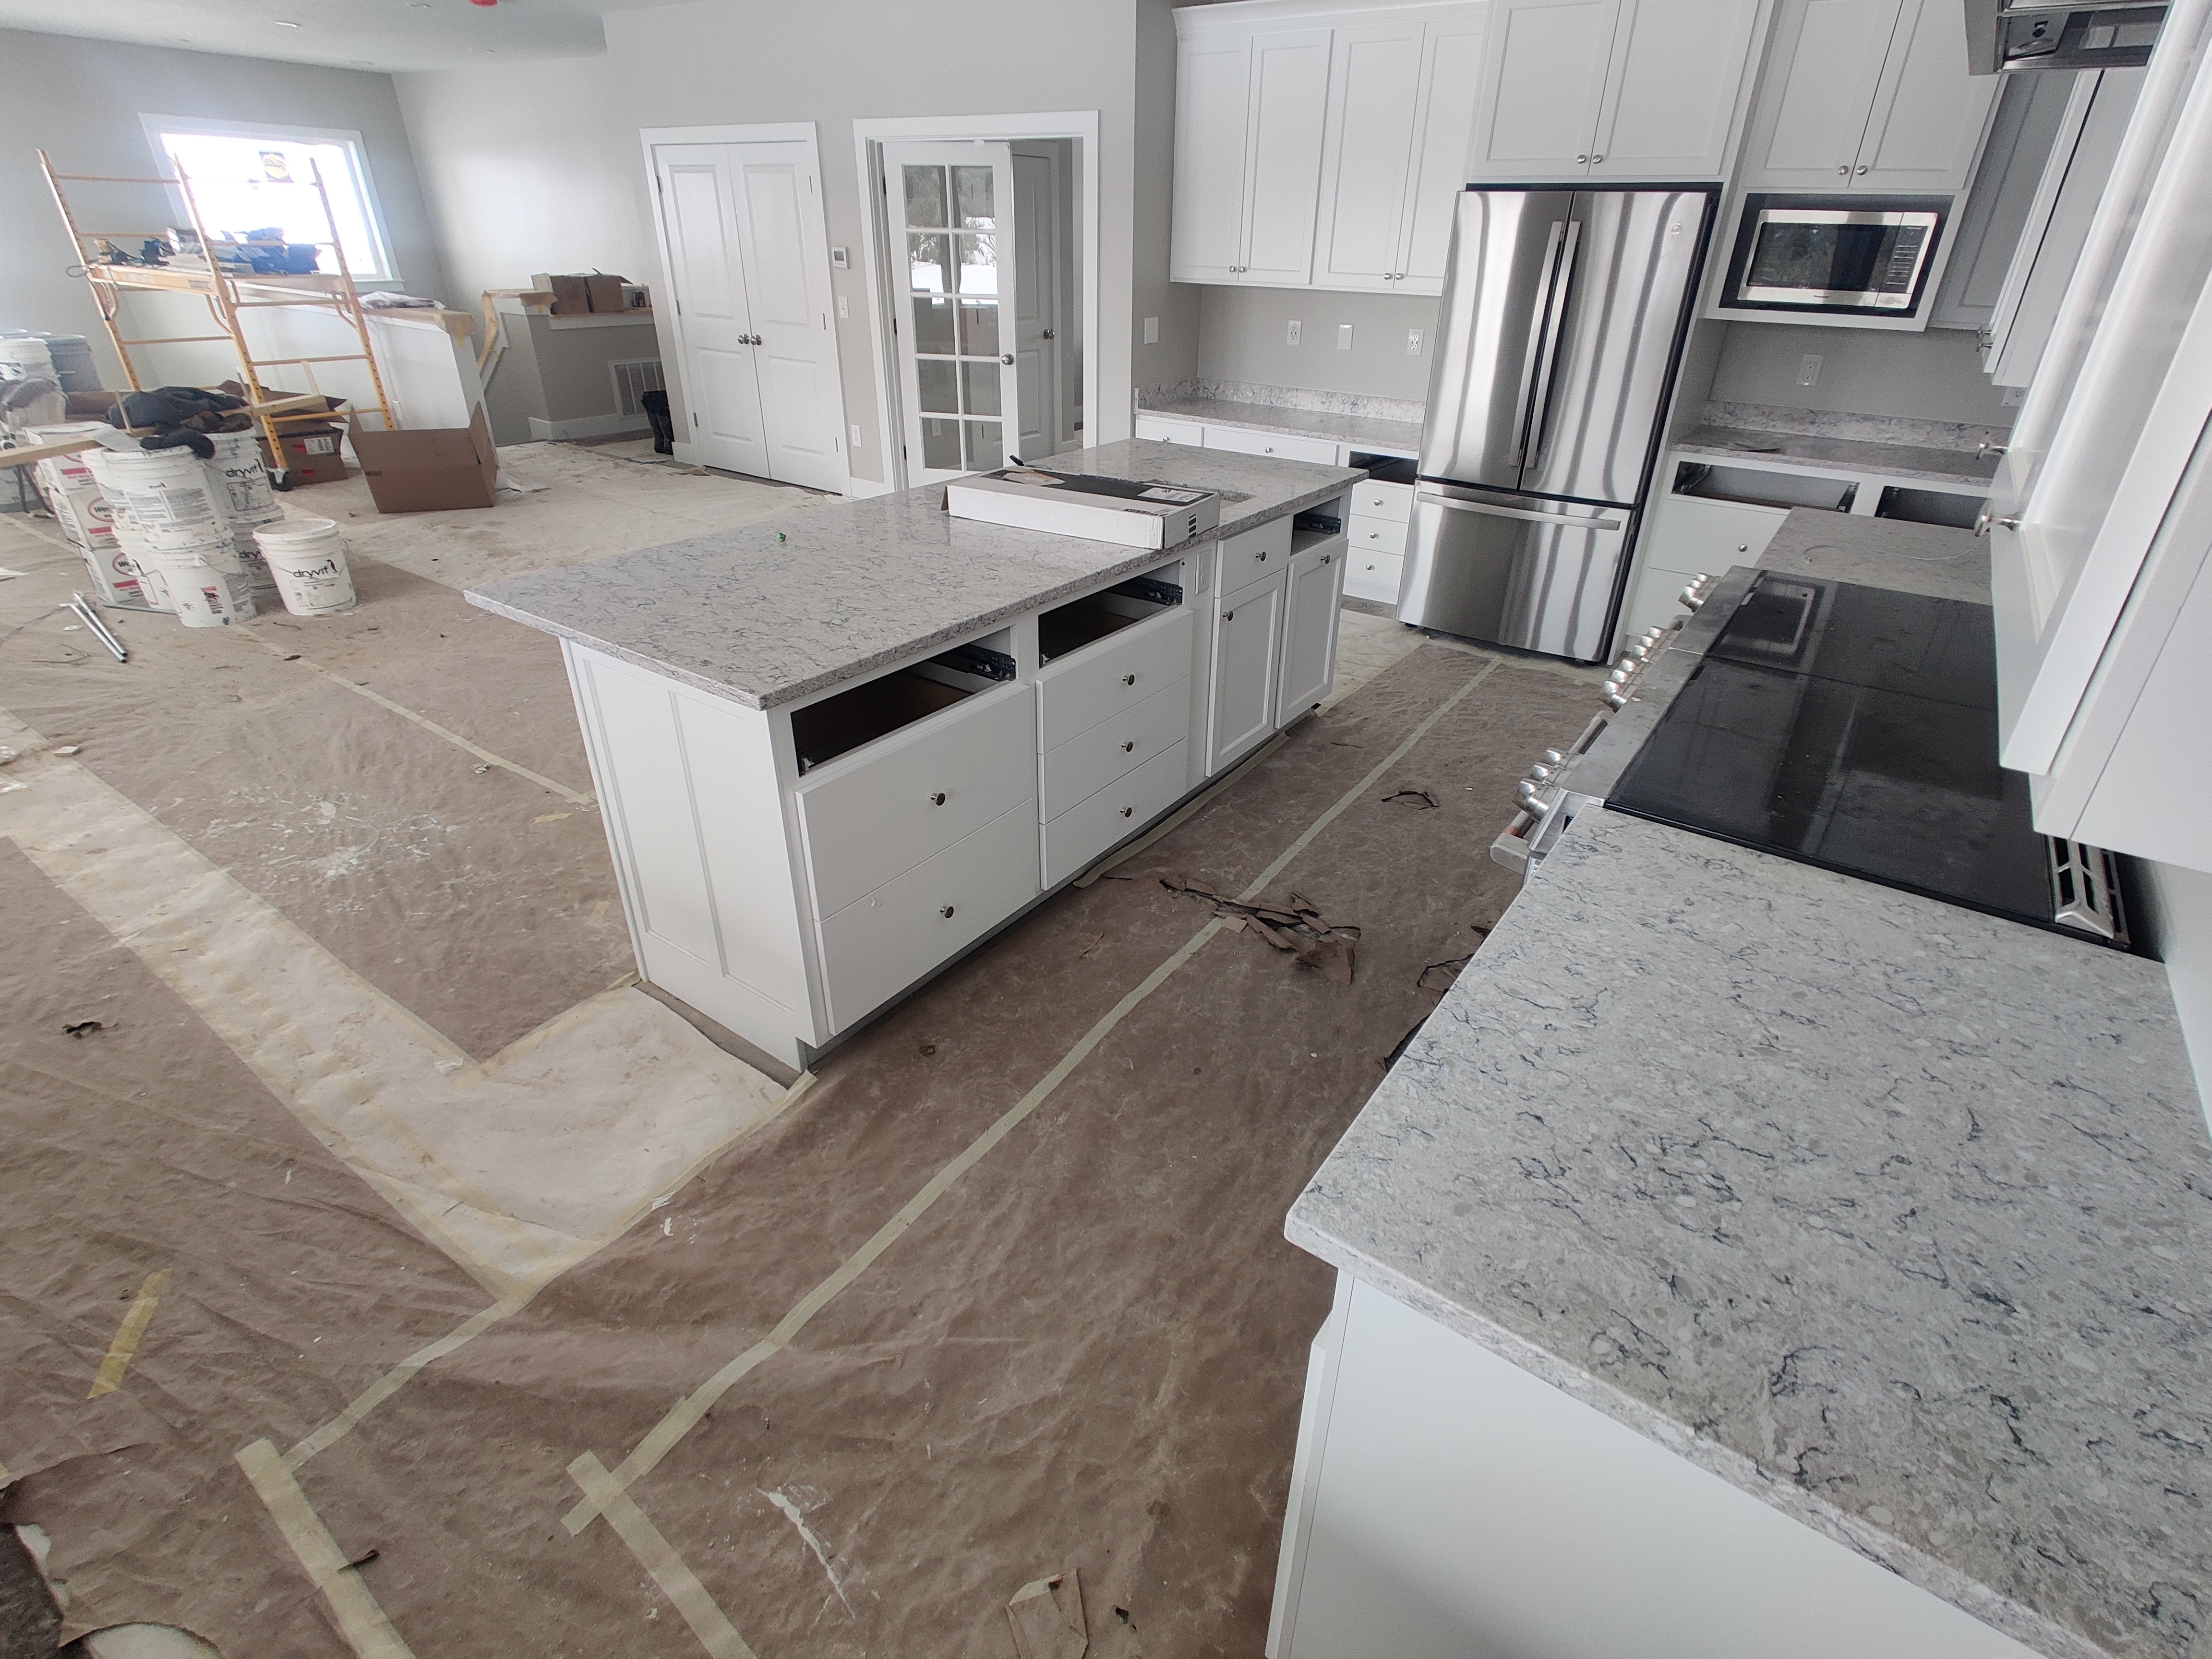
Kitchen looking North — open to dining and living areas.

Basement family room with wood-burning fireplace.
The part of the house no one sees — and the part that determines whether you're comfortable.
The building envelope is the perimeter of the conditioned area. That can vary, but in my home it goes from the foundation footer underground, up to the top of the main level wall, bridges to the drywall ceiling, then back down the other side to the footer, and across the basement slab. Every intersection needs to be detailed correctly to prevent air leakage. Some locations — like the footer-to-slab and stem wall intersections — seal adequately with standard construction methods. Others require deliberate work: the sheathing sealed to the concrete, the sheathing itself coated to prevent air movement, and the bridge from sheathing across the top plate to the drywall sealed — a junction that's particularly challenging because multiple contractors are involved. All penetrations through the drywall ceiling will leak air into the attic. Windows leak if not sealed properly to the framing.
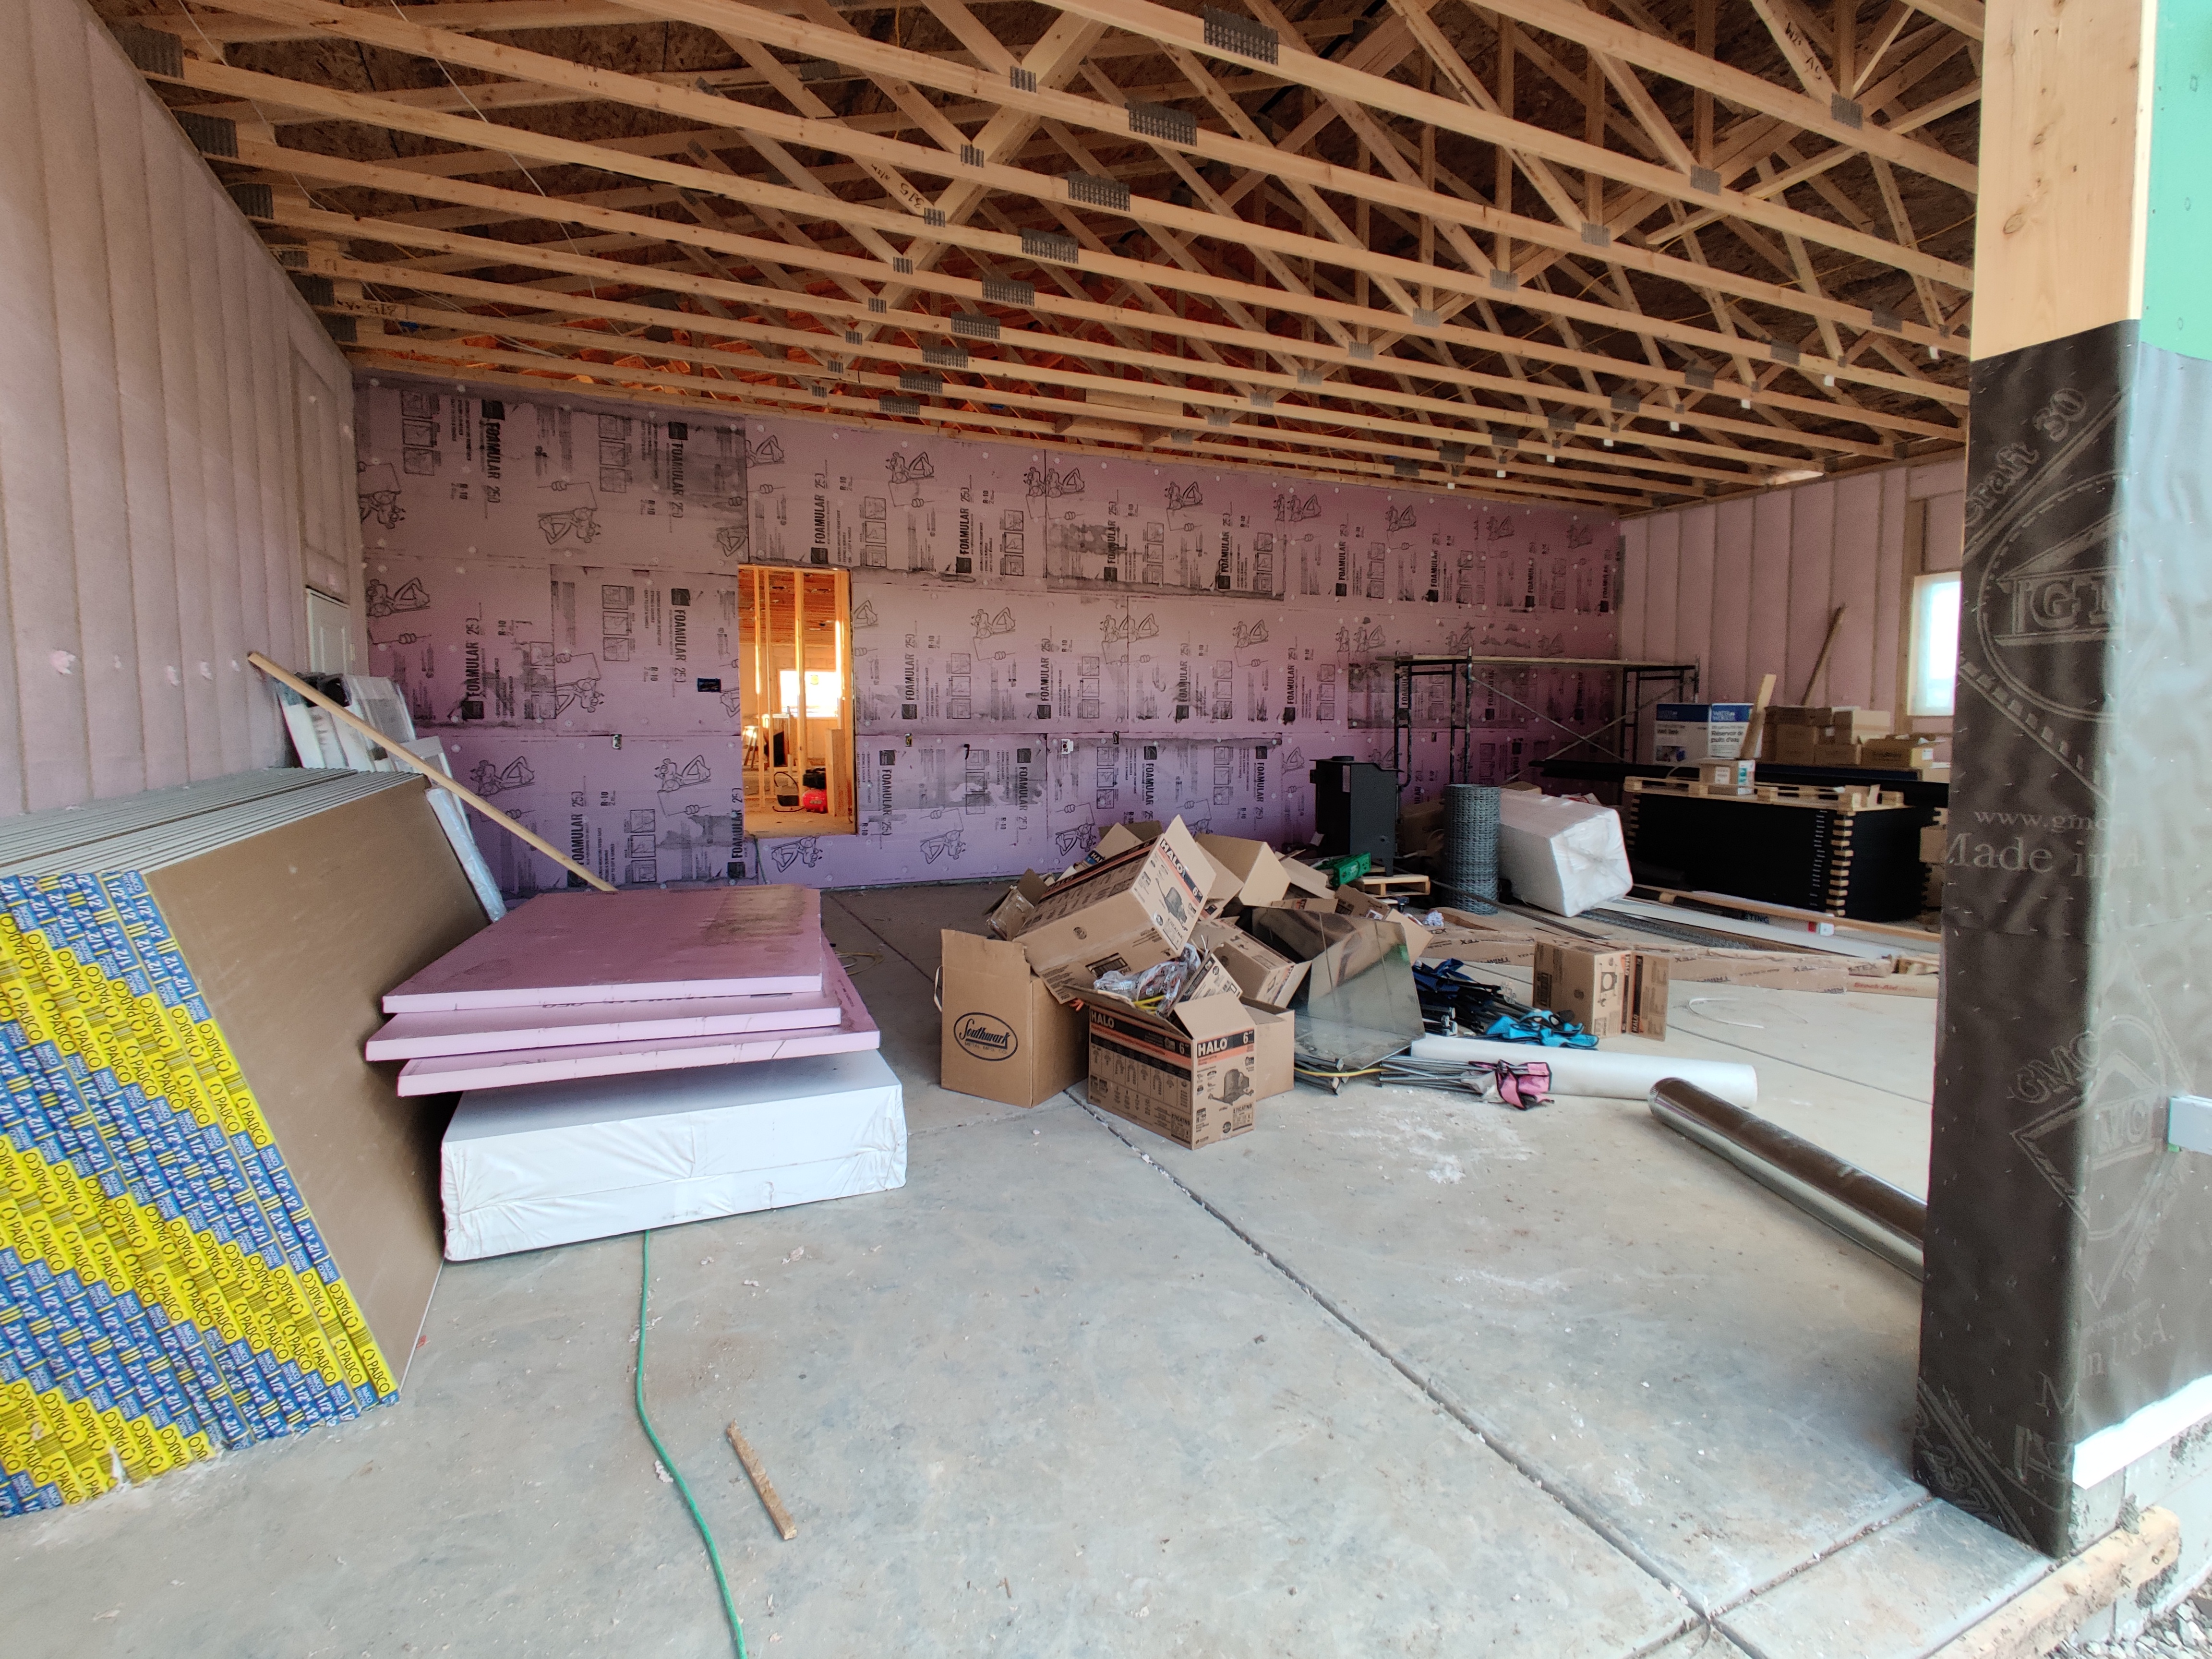
Some design details changed as the build progressed. We switched from fiber cement lap siding to stucco. Rigid foam costs got expensive enough that it was scrapped in the basement. I discovered the air sealing tape I was using didn't stick reliably to concrete and had to switch to a specialized sealant. The final system: highly flexible sealant sealing the ZIP System sheathing to the concrete; ZIP sheathing for the exterior with all seams taped; all window and door openings flashed with ZIP tape for air and water sealing; sheathing sealed to the top plate with sealant; and a drywall gasket applied to the interior of the top plate to seal when drywall was installed. The ceiling has almost 100 electrical penetrations on the main level. I sealed individual containers above each one to create an air barrier at every penetration — a project I'll cover separately in a journal entry.
The insulation is a continuous layer of 2" XPS rigid foam on the entire exterior of the main house (R-10), with wall cavities filled with dense-packed blown-in fiberglass for (R-22). The true total wall R-value is about R-25 accounting for thermal bridging at studs — not impressive by high-performance standards, but effective and affordable in my climate when paired with the air sealing. The ceiling is insulated to R-60. I used double-pane windows ordered with a solar heat gain coating — on a sunny day they're heaters, and the heat doesn't turn on at all when it's above 20°F and sunny outside. In summer, the roof overhang keeps the windows fully shaded all day.
House body air sealed and insulated independently from the garage.
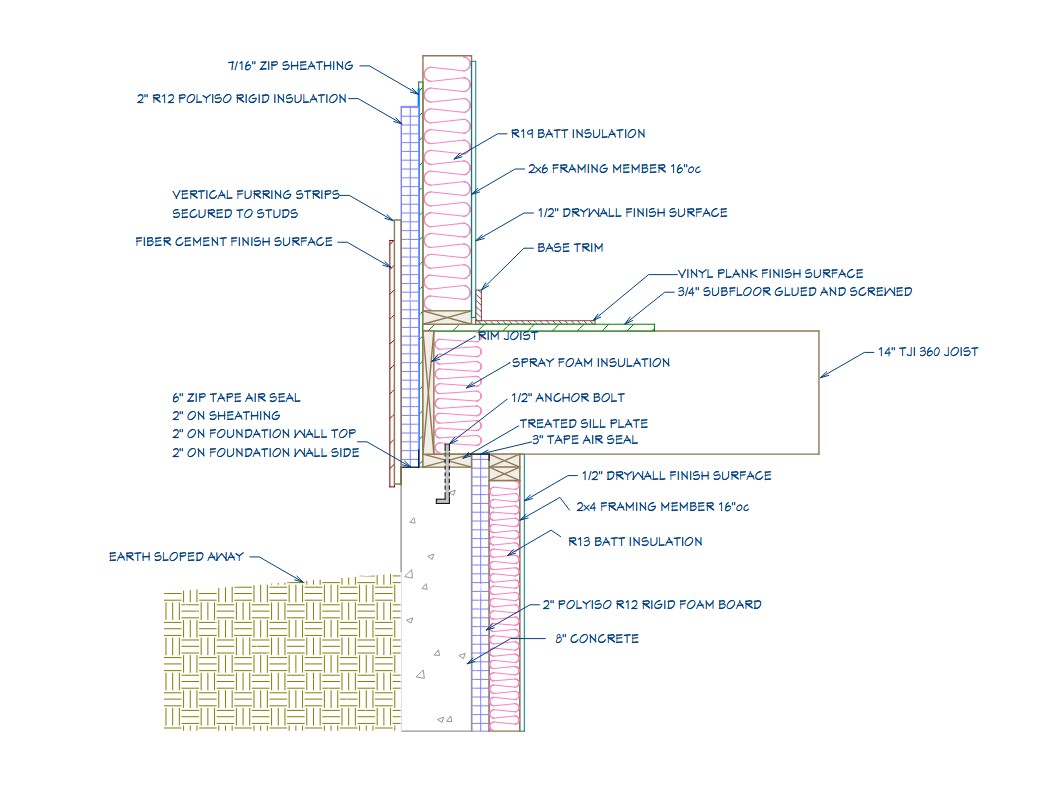
Exterior wall detail from the permit set.
2" of continuous rigid foam wraps the entire exterior before stucco.
A standard forced-air system. Extraordinary comfort. The envelope is why.
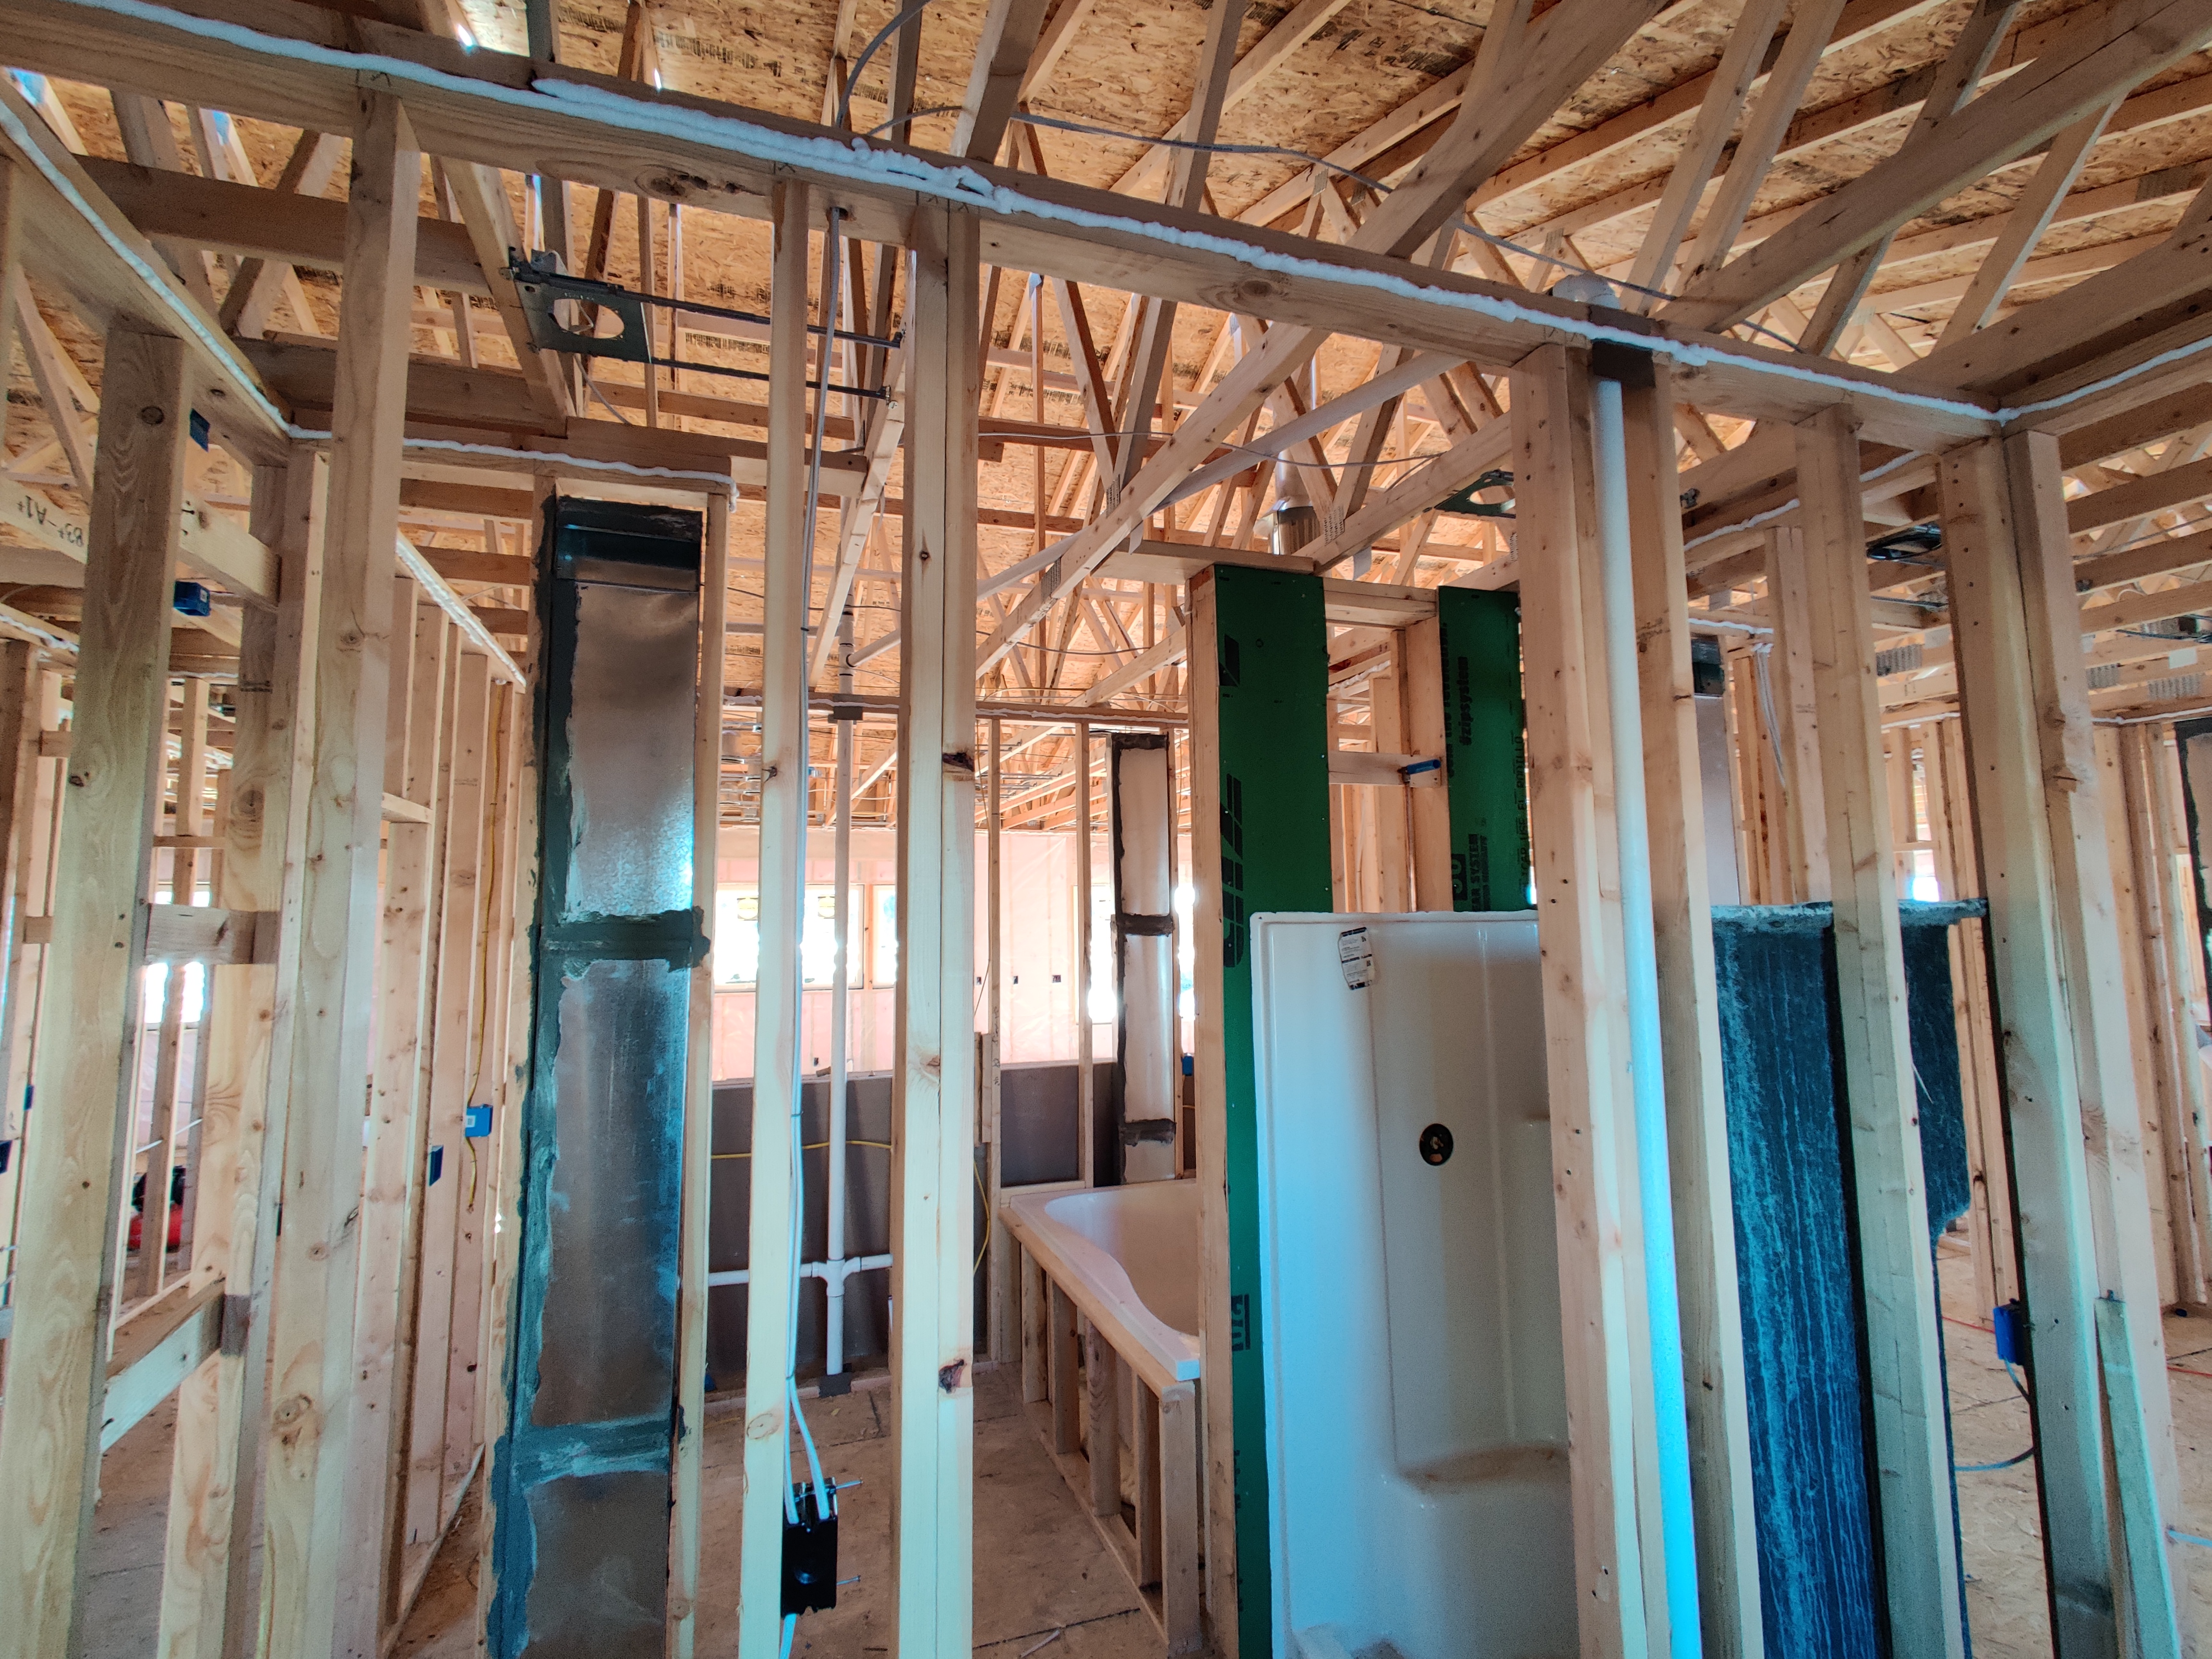
My home contains many smaller rooms off of other rooms within a large footprint. Standard mini-splits would have been too large for individual rooms and would short-cycle constantly, never running in their efficient range. Sizing them to a single unit per level would mean slow temperature recovery in remote rooms. I went with ducted mini-splits instead: a blower unit inside the house connected to outdoor heat pump units — the same physical arrangement as a standard forced-air system, but with heat pump efficiency. All ductwork runs inside the floor joists supporting the main level, completely within the building envelope. No energy is lost through ducts running in the unconditioned attic.
The house uses two units: a 1.5-ton unit for the basement and a 2.5-ton unit for the main level. A house this size by rule of thumb would get 7–10 tons of capacity. I have 4 tons total and I only need 3 tons, but that's just how it had to be. Everyone told me it wouldn't work. I had to sign a waiver before the HVAC company would do the install so they couldn't be held liable for rework costs if capacity was insufficient. I was right — but I was right because I did the math, not because I guessed. I had local historical climate data to determine worst-case scenarios. I knew how tight the house was supposed to be, how it was insulated, and how many windows and doors it would have. That let me calculate room-by-room heat gain and loss and select units from manufacturer performance tables that would meet my actual load requirements. That process is what I produce for every client in the High-Performance drawing package.
Building a house this tight required controlled ventilation — otherwise the air inside becomes stale. I installed an ERV (Energy Recovery Ventilator) that uses a heat transfer core to allow incoming and outgoing air streams to pass near each other without mixing, transferring energy from the conditioned exhaust to the incoming fresh air. In winter, fresh air enters pre-warmed rather than at outdoor temperature. The house gets fresh air continuously without exhausting conditioned air.
Solar, battery storage, generator backup, and a complete water system — designed as a unified whole.
Sizing an off-grid electrical system requires balancing peak demand, sustained demand, and seasonal variation in both production and consumption. What you find quickly is that Thanksgiving and Christmas are your worst-case scenarios — high demand during low production. Running a generator during those periods is expected and designed for. It's far cheaper to use a generator occasionally to recharge batteries than to size the solar array for the absolute worst case.
I used building simulation software to calculate heat loss under various weather conditions and ran multiple simulated winters. I combined that with appliance-by-appliance load estimation cross-checked against actual utility bills from prior homes, then wrote software to simulate how various combinations of array size and battery capacity would perform across different winter scenarios. I found that beyond a certain point, increasing battery bank size stopped helping. Increasing array size always helps but returns diminish. The most cost-effective system balances all three: array, battery, and planned generator runtime. My analysis showed I needed to plan for up to 200 hours of generator runtime in a bad winter, with as few as 20 in a good one. Most solar estimators and designers don't know how to design a system that performs well in winter — they focus on annual generation and time-of-day production rather than real winter days, sizing by the same rules of thumb that plague other trades.
The biggest surprise was the well pump. With only a single pressure tank, the pump cycles on frequently to maintain house pressure — drawing more power per year than anything else in the house. The water system is something I'd approach differently in a new build, covered in the lessons section below.
Electrical System
- 56 roof-mounted panels — 20 kW
- 16 ground-mounted panels — 6 kW
- 2 × SolArk 15K inverters
- 2 × Fortress eVault MAX LiFePO4 — 37 kWh
- 7 × home-built LiFePO4 packs — 100 kWh
- Diesel generator — 20 kW prime output
Water System
- 400-foot well
- Variable frequency drive pump controller
- Peroxide injection — 4-stage filtration
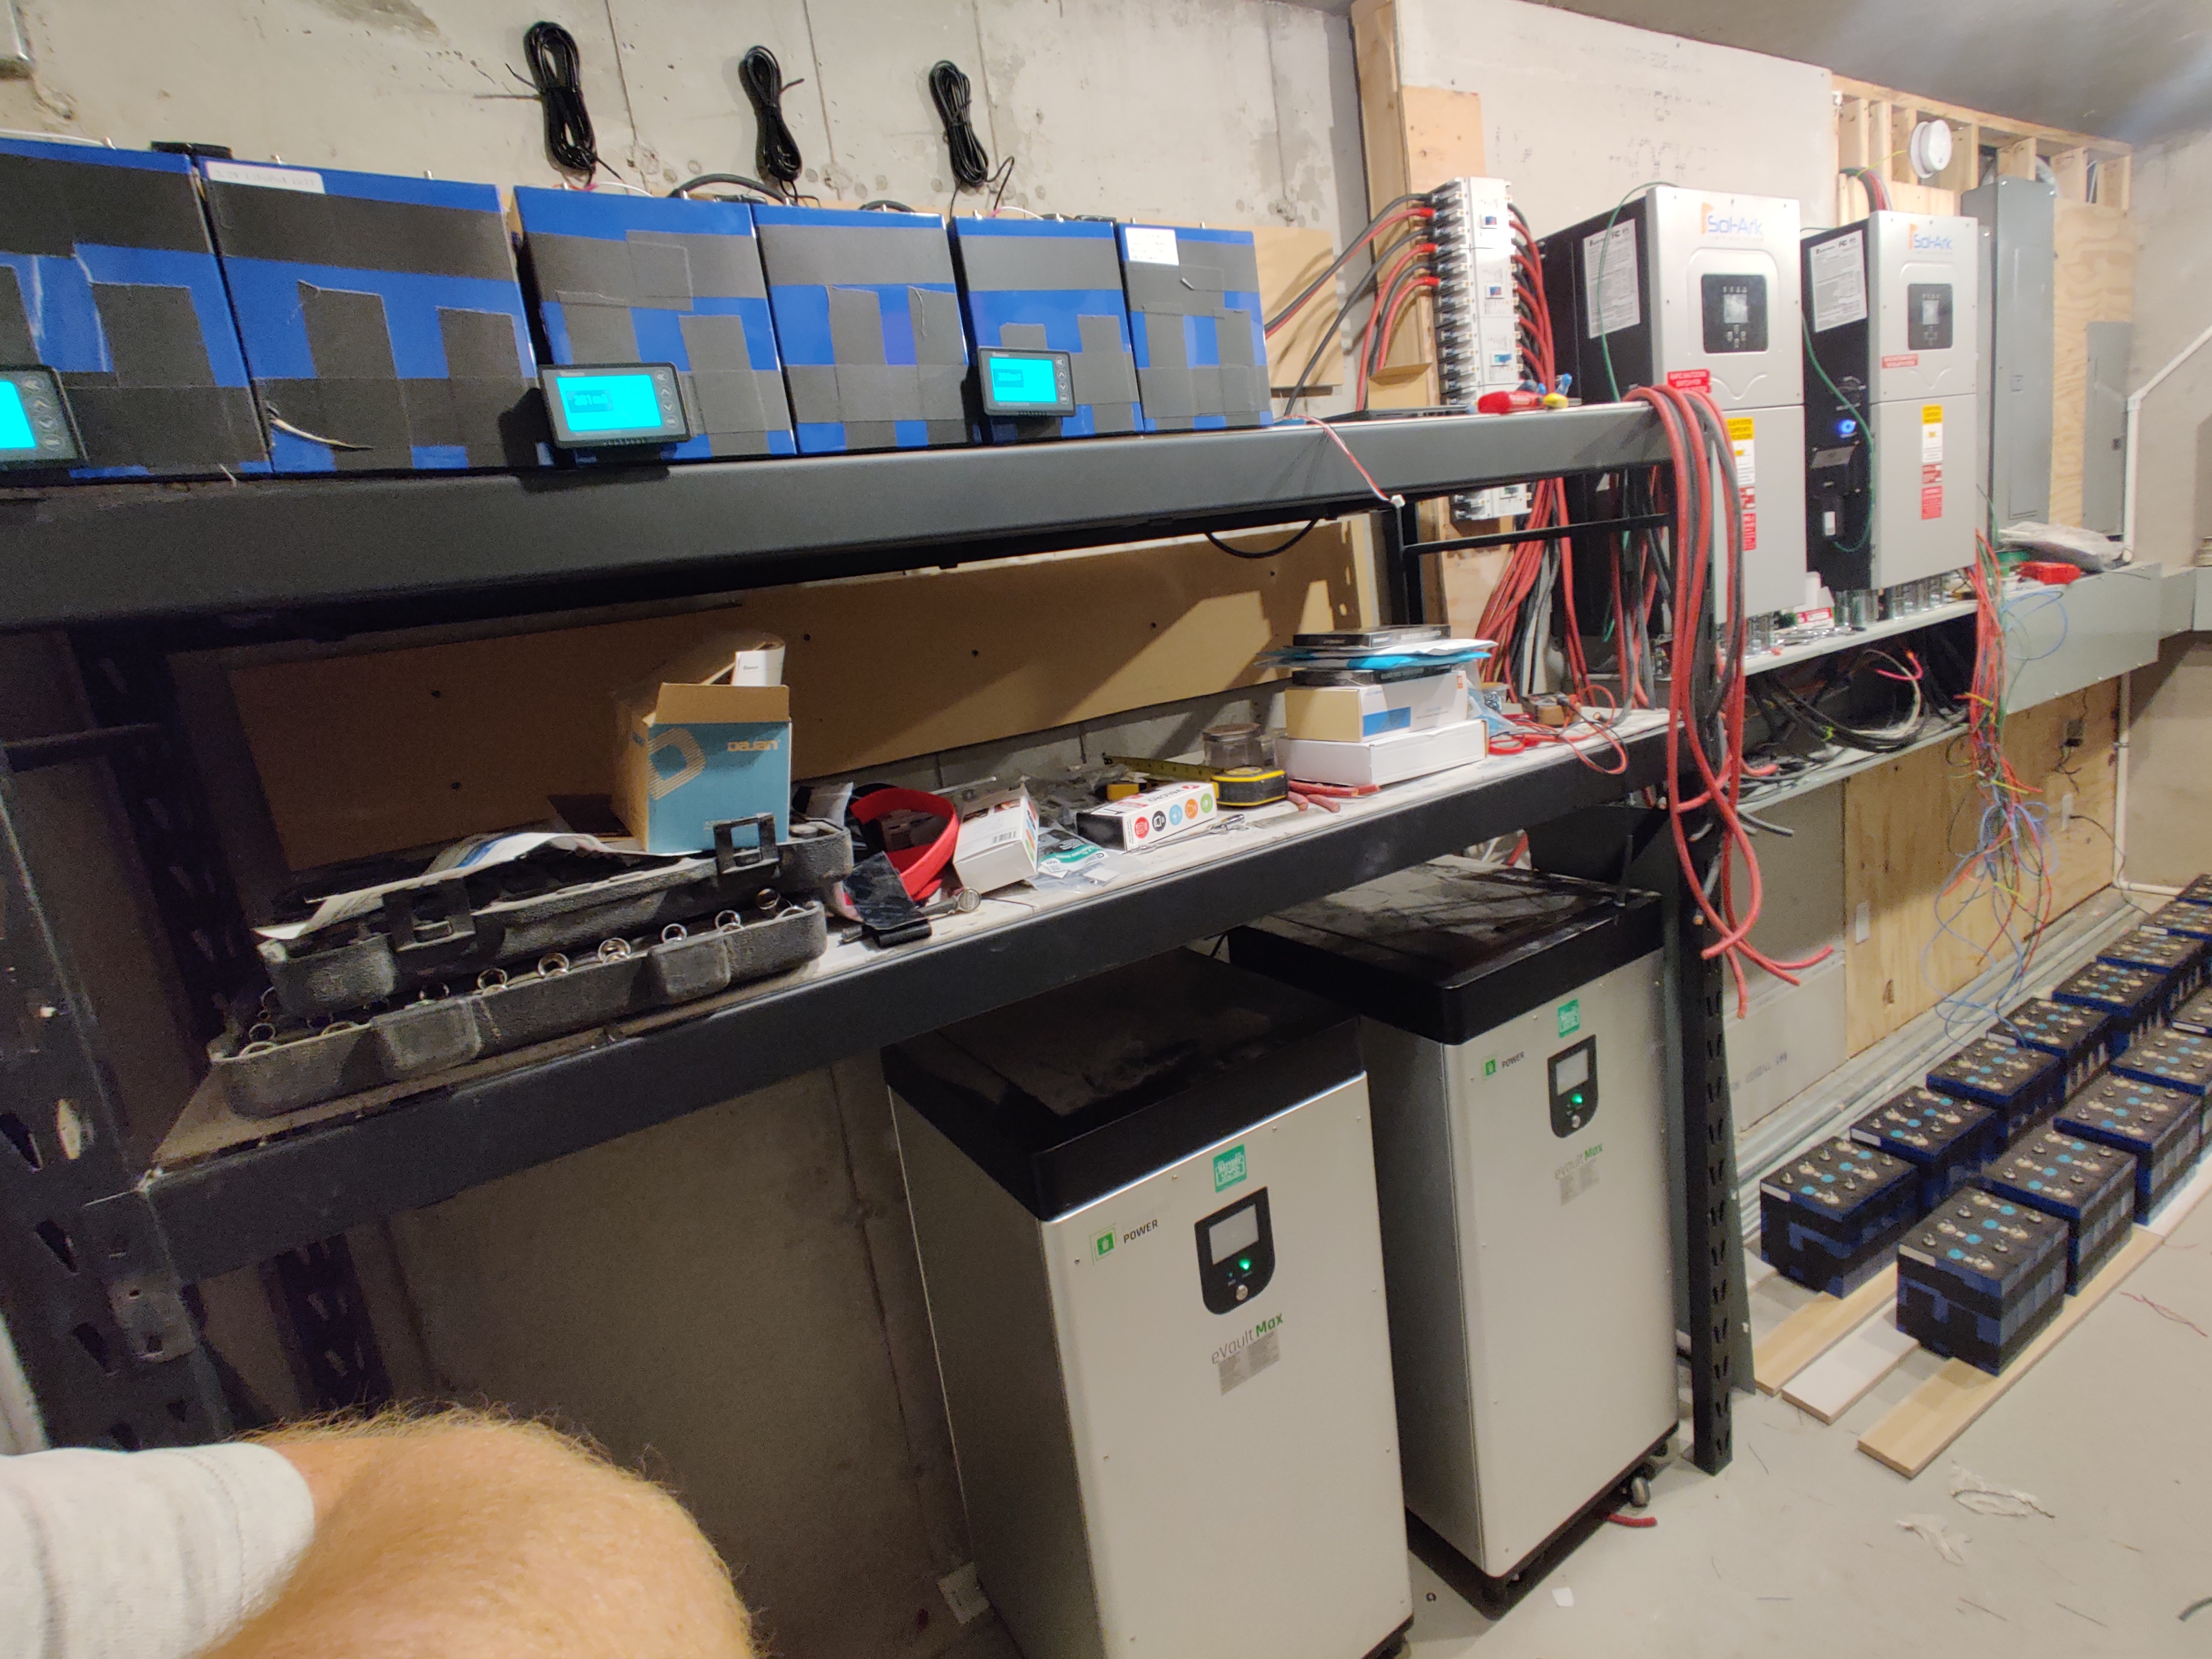
Battery rack, inverters, and combination panels in the electrical room.
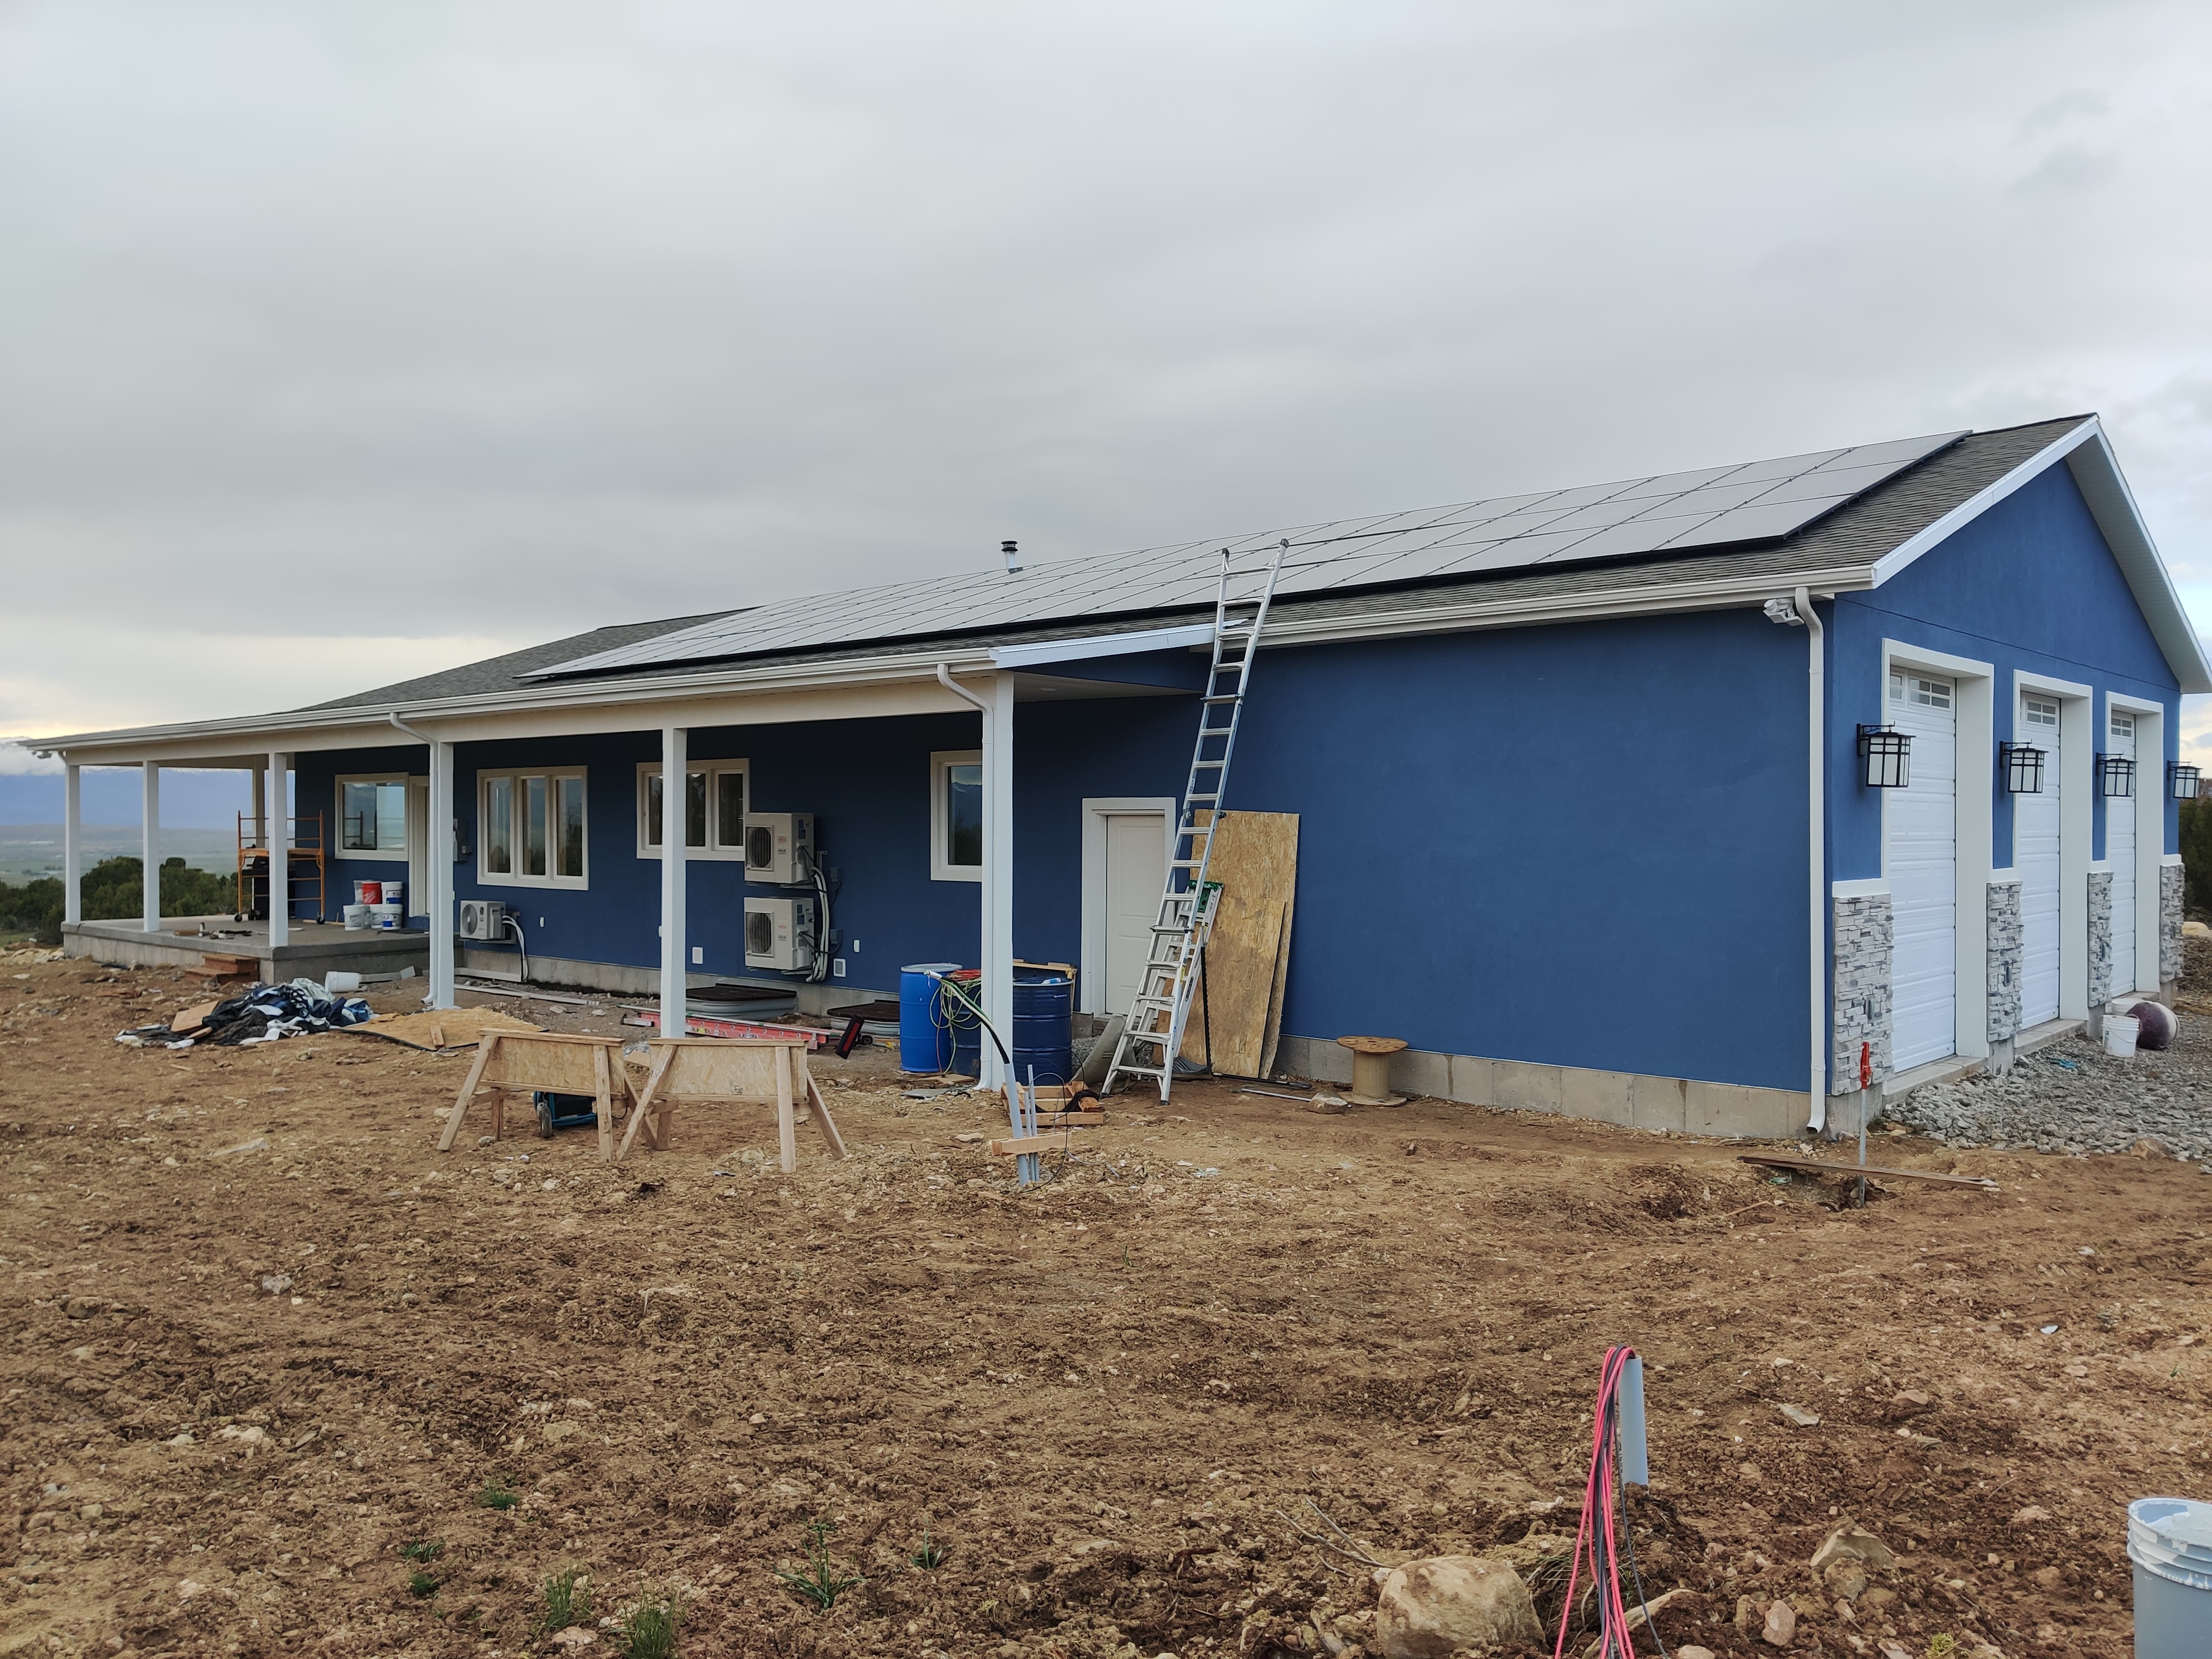
Three rows of panels across almost the entire south-facing roof surface.
The county was not experienced in reviewing an off-grid electrical system.
Being a fully permitted build was a different experience. The county building inspectors knew that many solar and battery installations in the county had never been inspected. At first they were not going to approve any off-grid plans. I eventually convinced them by getting a solar contractor involved — the law allows a homeowner to do their own work as long as it's inspected, but I was on a timeline and going to court to fight would have been expensive and slow. That solar contractor turned out to be the single most frustrating part of the entire build. He was in my opinion completely incompetent — a salesman, not an installer. I drove everything myself, caught a catastrophic wiring error that would have destroyed $15,000 in equipment, and ultimately rewired the entire system to get it working correctly.
Once that hurdle was cleared, everything went fairly normally. I had to prove that the house didn't need standard house wrap because of the ZIP System, and that exterior foam was acceptable. I used building code and manufacturer technical documents to convince the county officials. The key is to discuss out-of-the-ordinary details competently and with confidence — with your evidence already in hand. Building officials are usually just trying to do their job. They're used to doing things a certain way. They're not opposed to learning something new, but they prefer evidence from sources they already trust, and they need time to consider it. Expecting fast turn around with new ideas is not realistic.
Managing a complex build from the design side.
I couldn't find a general contractor who could build the home I wanted, so I used one I trusted and wrote some tasks out of our contract that I would control completely — water, solar, and permitting. I tried to make everything else as standard as possible from his perspective. We walked through the unique design details and talked about how to fit them into the standard construction schedule. That conversation produced some changes to the wall assembly details that simplified the process while still hitting my performance numbers — and actually saved some money.
My general contractor had been a framer for years. Once I showed him the differences between normal framing and what I needed, he understood immediately and I could trust him to execute it. The HVAC was more disappointing. The contractor didn't follow the duct design I had produced because it was too different from what he was used to — duct sizes were outside of ordinary, designed to be quiet and to limit airflow to rooms that didn't need it. By that point in the build I was exhausted and the solar contractor situation was consuming my attention. I let schedule pressure and contractor resistance wear me down and didn't require my design be followed. The system isn't as good as it should be as a result. I should have made better use of my general contractor to help me get that done right.
The build went relatively smoothly all things considered — we moved in nine months from permit issuance, which is a quick timeline. My contractor told me afterward that it had gone about as smoothly as a normal build. For me as the designer, the best moment was seeing the house turn out to look exactly like the 3D models I had produced. When the drywall was up and the exterior was finished, I took my wife on a tour. She was shocked that she knew her way around perfectly. Everything looked exactly like she had been expecting.
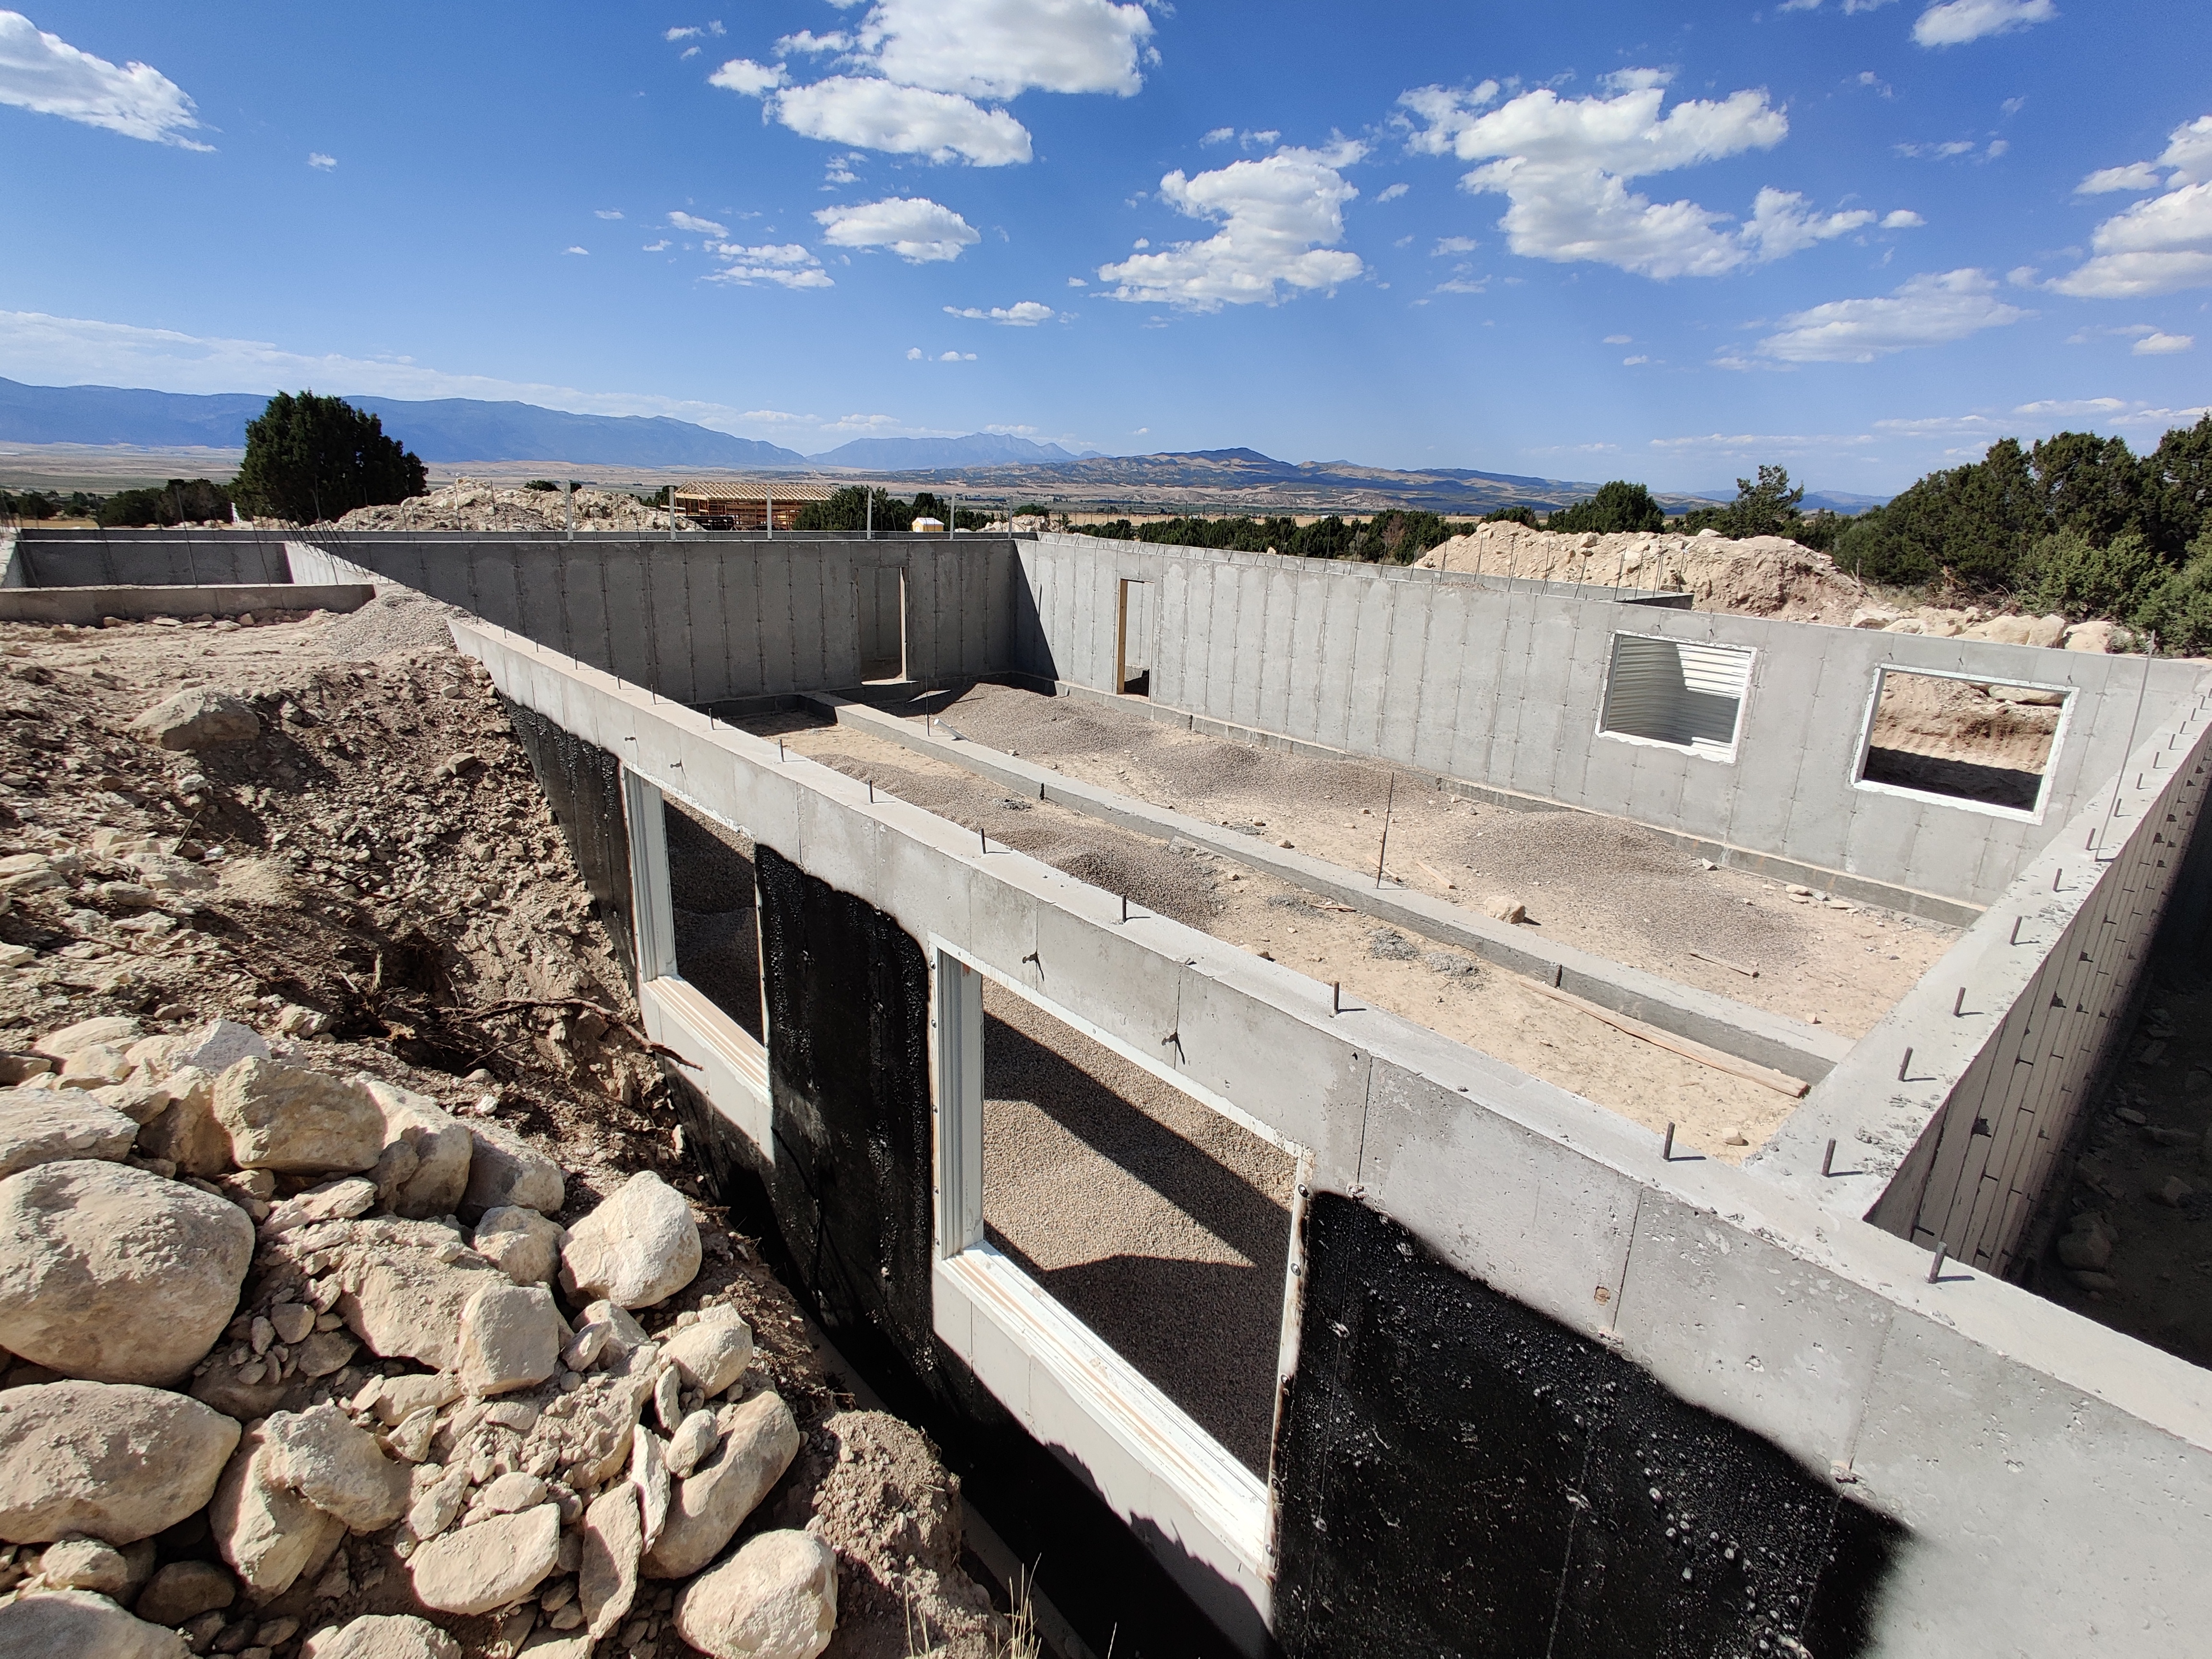
Foundation with waterproofing.
Garage insulation — never frozen even at −20°F.
Air sealing at the top plate and drywall junction in the master suite.
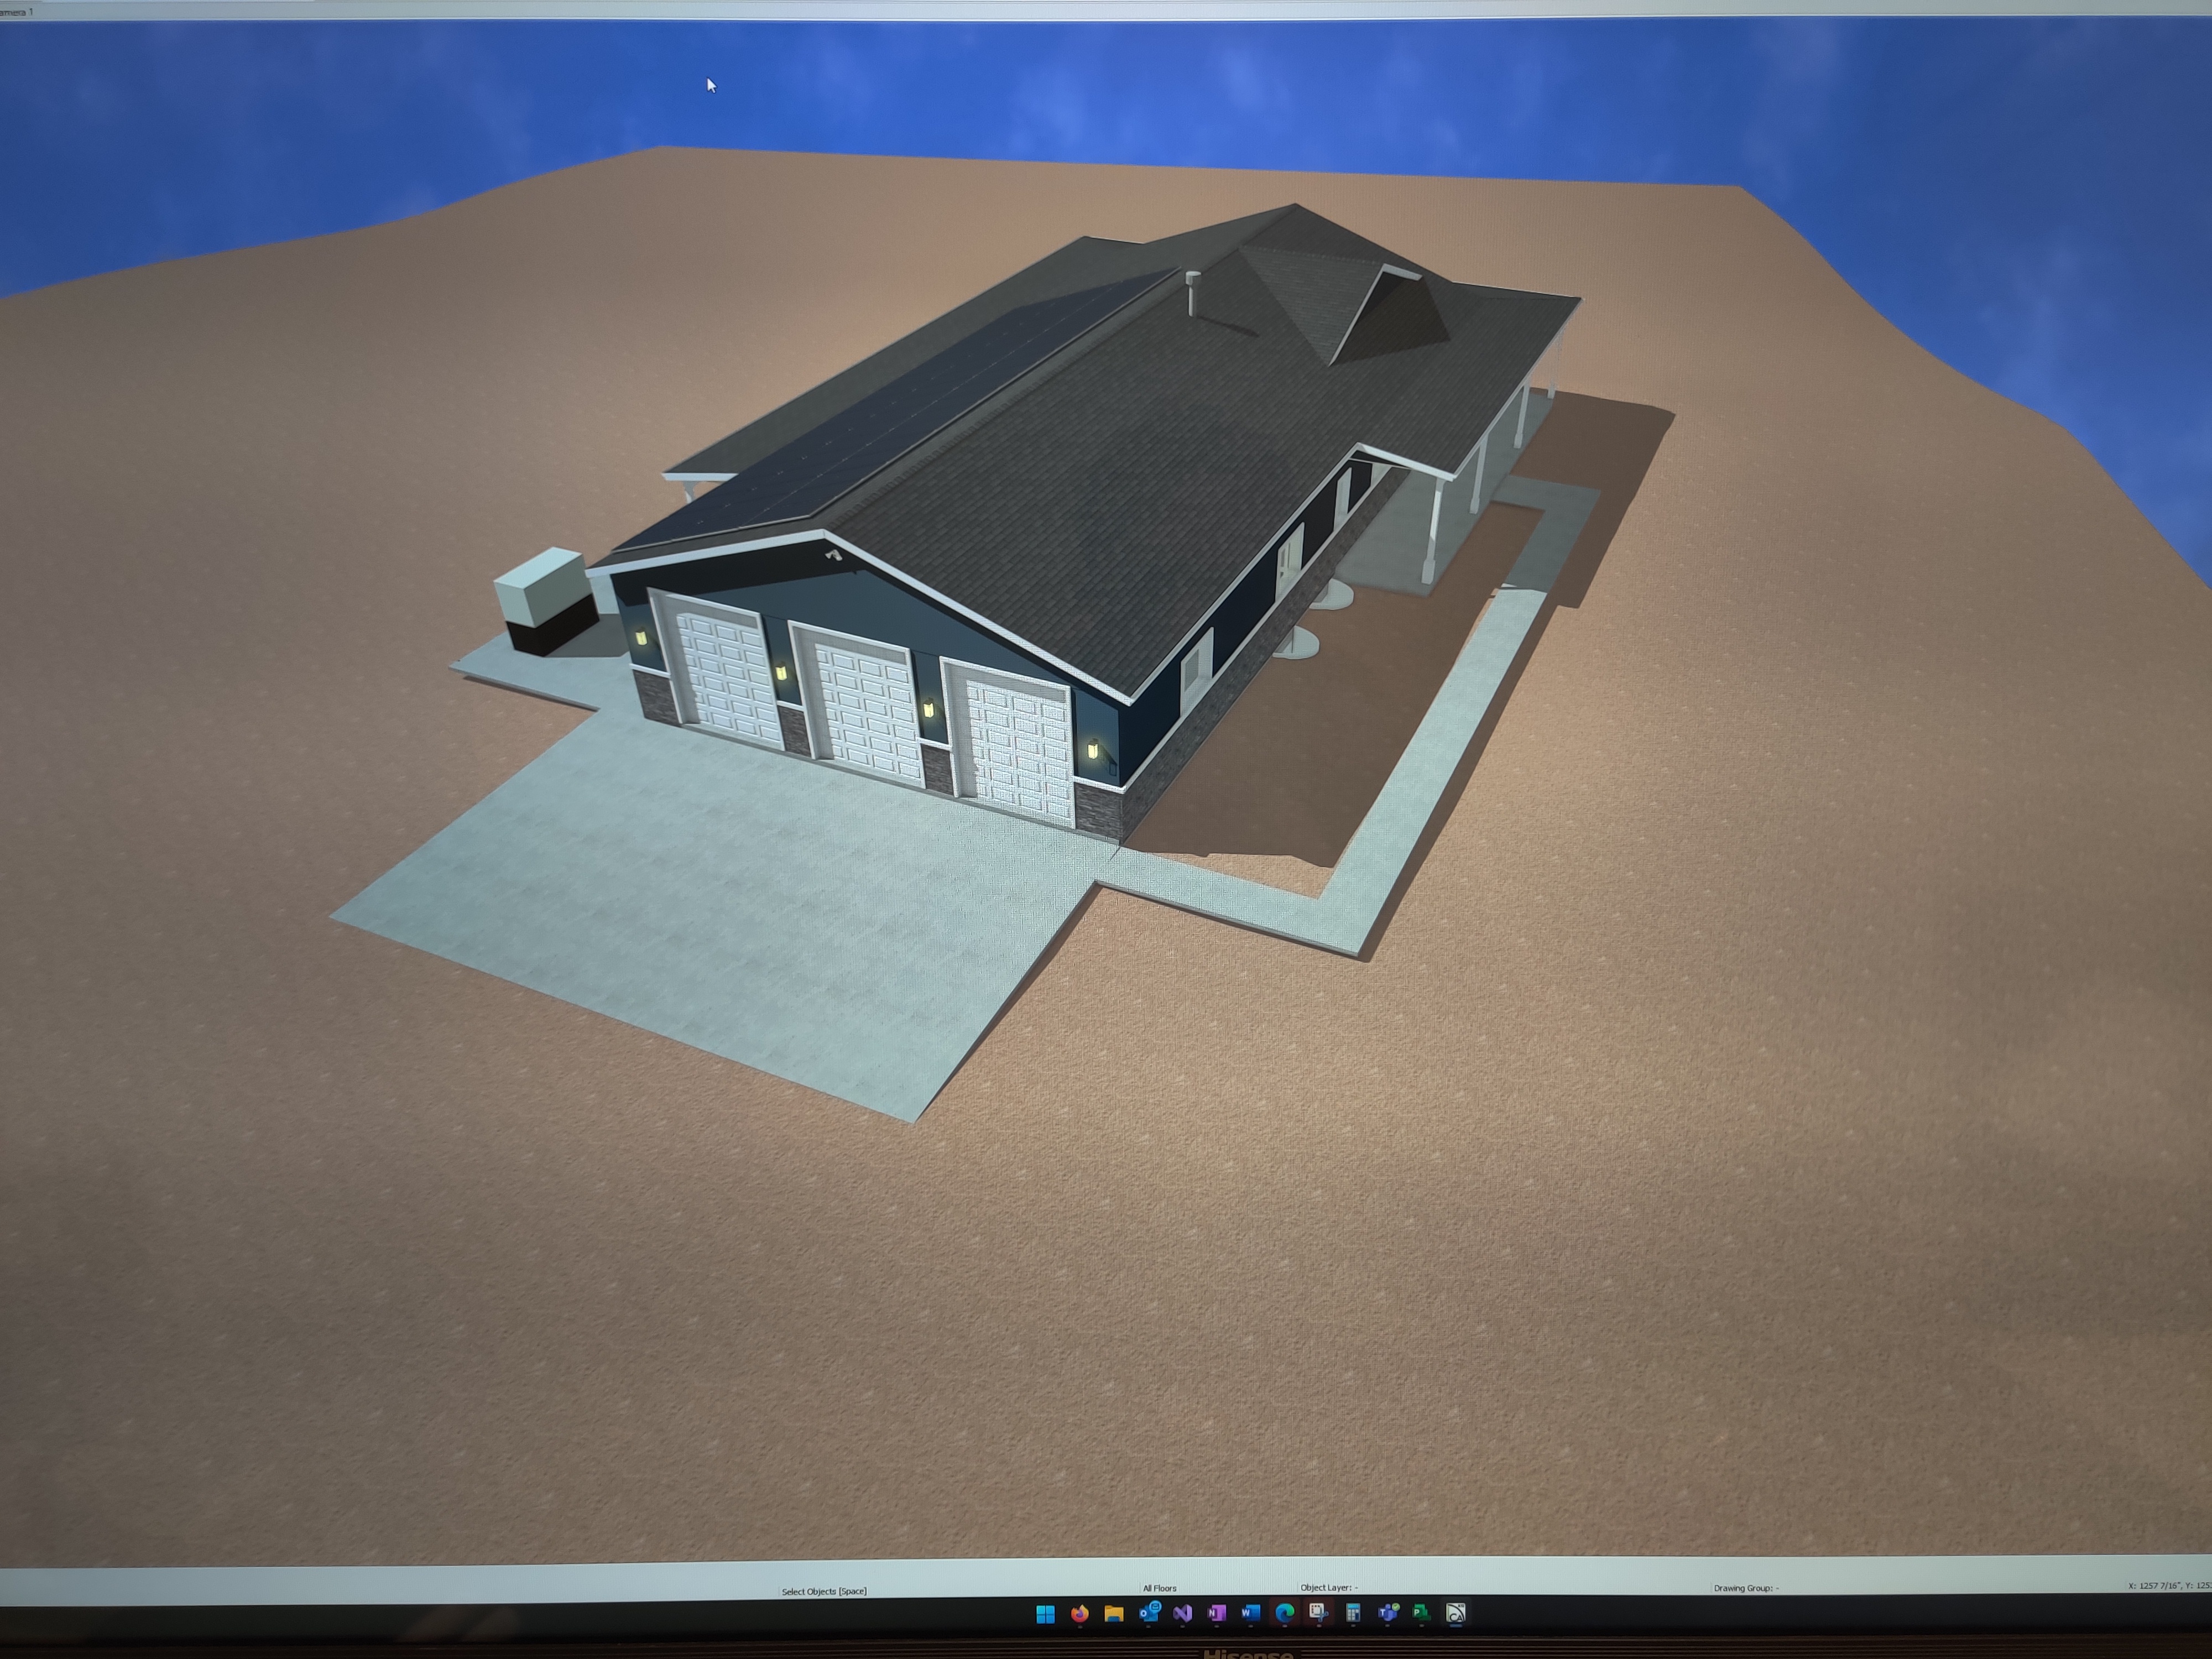
3D model from the design phase — the finished house matched it closely.
What the numbers say — and what it feels like to live here.
My official goal for the house was to test below 2.0 ACH50. My real goal was 1.0. My secret goal was 0.80. The air leakage test came back at 1.03 ACH50. I hit my official goal but barely missed my real one. We searched for the remaining leakage with a FLIR camera and found a few small defects, but nothing that closed the gap significantly. A couple of days after the test I discovered that some floor drains had been uncovered, but no water had been poured in. These open drains allowed air to vent through the plumbing system. We didn't re-test after filling them, but based on the size of those openings, the result would likely have been 0.85 ACH50 if we had. Not bad for a first-time build that included a wood burning fireplace and chimney.
Blower door
1.03
ACH50 measured
HVAC installed
4T
vs. 7–10T by rule of thumb
Winter thermostat
70°F
vs. 68° in prior homes
Est. annual utility savings
$4,400
vs. standard construction
In our past homes we kept the thermostat at 68°F in winter and 78°F in summer to save money. We wore sweaters all winter and bundled babies because the floors were cold. Now we keep the house at 70°F in winter and 74°F in summer — and 74°F feels cold enough that going lower makes people uncomfortable. In winter everyone dresses normally. Babies play on warm floors in normal clothes. The leather couch isn't a sticky mess in summer or a cold rock in winter. I would pay for this level of comfort even if it didn't save money on utilities. It is worth it.
A full winter's power consumption data confirms the system is working as designed. The four largest loads: well pump (2.45 MWh), main level HVAC (1.17 MWh), basement HVAC (1.07 MWh), and water heater (0.86 MWh) — totaling 5.55 MWh, or 45% of total household consumption. The well pump drawing more than either HVAC unit was the biggest surprise and something I'd address differently in a new build.
To put the energy performance in context: I compared our consumption with a friend in an all-electric grid-connected home — 4 occupants, 1,200 square feet. They use more power in winter than we do despite our household being nine people in 5,000 square feet. A home of our size built to standard practices would use roughly 6,000 kWh per month in winter — about $722/month in utilities if grid-connected. Our home, if grid-connected, would run about $289/month with all utilities included. High-performance design saves approximately $4,400 annually compared to standard construction. Those savings pay back the additional design and construction cost in a few years. For our off-grid system, the high performance design has made my house possible to build.
Years of living in a home you designed teaches you things no textbook does.
The garage should have been four feet deeper. I had a shop as part of the initial build plan but scrapped it when materials costs rose. The garage was designed for parking and some storage — not for working on vehicles. I feel that constraint regularly.
I would have done fiber cement lap siding. The stucco is fine, but lap siding looks classic and is what I always intended. It was a cost decision during the build.
I wish the solar array were ground-mounted. The roof mount is fine for production, but the low pitch — 4:12 — means snow sits on the panels rather than sliding off. Manual clearing in winter is required and can be dangerous.
I would address the water system differently. Either a deeper well or installed storage. The well doesn't have enough to be completely comfortable. Storage would also allow a standard well pump rather than the VFD controller, reducing power usage by possibly 50%.
I would not use a diesel generator in a client design. Diesel engines require significant preheating, they don't like being run lightly loaded, and they cannot be integrated seamlessly with modern inverters for full automation the way propane can. I manage the generator manually through a multi-step startup and shutdown sequence. For clients I recommend propane — it can be fully automated, often shares a fuel supply already on the property, and integrates cleanly with modern inverters. I might choose diesel for myself again, but I'd do it knowing what I was signing up for.
I would rough in a dryer duct to the exterior. Our condensing dryer doesn't do a great job and needs frequent maintenance. Adding a ducted dryer now will be expensive. During the build, roughing in the penetration and stub-out would have cost about $100.
I would have demanded that my HVAC duct design be followed. I had the right analysis, the right numbers, and a design that would have produced a better result. I let schedule pressure, contractor resistance, and my lack of confidence stand in the way of my goals. The HVAC is the only system in the house that doesn't perform as well as it should — and it's the only one where I didn't hold my ground.